You can edit very simply and professionally, read the article completely, and learn all the points. What you need to edit this video is the background music and transition effect, as well as a circle effect called mandal. The background should be green and create a festive atmosphere. So, step by step, let us know.
How to create a background
Generally, many people search for ready-made backgrounds separately, so they may not find what they want, and it may be too late to search for these backgrounds. So most of the time, waste is about these backgrounds and effects, so instead of that, let’s know how it would be if we create it ourselves. After you open the Kine master application, take a new project and take a 16:9 ratio there, then click on Create new, we will see that interface, so now we have to add a colour image of your choice, but a nature image. Now you need to add as many slides as you want to create. Then add any blur effect to that ima,ge and then go to the blur effect setting and add strength from two to three. Then add any golden particles or any other attractive animation on it and make sure that it is lively and colourful. For this, when we tap on an image, there is an option called adjustment on the right side, in which the HUE option is visible. Through this option, you can add different colours. It can be done, so if we create it ourselves, the background we like can be easily set.
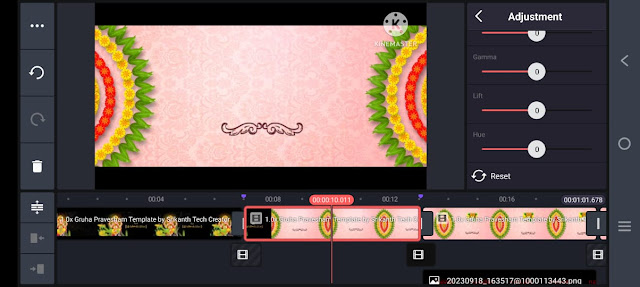 So the titles are also very important for you to create this video
How to create a title and an invitation video
Many people use third-party apps for professional text or titles because they are used to creating professional-looking and attractive text, so now I will tell you how to create it in a Kine master application on mobile without using any app. For this, open the same application and take a new project, take an image or video in the background and come back and again click on the same image or layer, and on the right side, we have many options. Back comes again pan and zoom option will appear click on it click on equal to and move to left or right we have the background will change to transparency now click on the text you like on the layer and click on the text and name and titles as you like Add at the top of the screen and also add dividers and on the left side there is a view and capture option click on it, and you can save it to your gallery the image is saved to your gallery in PNG format so you have to prepare all the titles in advance. Now open the old project again.
How to add a photo to a video
For this, you don’t have to click on media and add a photo. After adding, we have some options on the right side, crop option, but there are many shapes in it, circle or rectangle of your choice, take a shape and come back,k and there you have an option called feather. If you want to write a text or name related to this photo, you should add a small photo on the left or right side of the slide. After adding this photo, the animation should also be done. So for these animations, when we click on the text or photo, and scroll down on the right side, there is an option called transform. In this transform option, we have many animation-related options; you can use them and manipulate them as you like.
How to turn a video into a professional look (Conclusion)
The common mistakes made by many people are not taking a high-quality image or video while importing the video, not being able to apply transition timing at the right time, not being able to add animation out of animation, and not giving enough frame rate in high quality and frame rate even during exporting, due to which the look of the video is completely down. So now you can export the video professionally by following the steps that I will tell you. First, make sure that the reservation is of high quality, whether it is a video or a photo, and then, when adding transition effects, we need to pre-set it perfectly. Support:t If you want to add a transition effect of just one second, just take one second. Fourth,s you have to take the same animation duration for all the layers. Then, when you get the correct result. Import the video in high quality. If there are any more cinematic frames,s add them above this. We will find them in the same application by default. Now you have to click on the save option, select high quality, make sure the frame rate is between 30 and 60, nd 60 then tap on. This will be successfully saved to your gallery. In this video, mandala images are the PNG images that should be the main focus to look attractive. Because even till the video is completely edited, the same PNG images are there, you have to animate these PNG images along with the text. You can use 2 options to animate. The first is the merge option. Secondly, in camera, in these two ways, you can animate the layers, one font for subtitles, and another font for programs, and edit the video with a different font. Ifles, if you want, you can add photos of the house as well as invitees in this video. Should also apply. Covering all the layers in one slide and copying them can create other slides as well. After fully editing the video, play the edited video from beginning to end. If there are any errors, correct them and upload the switches. Finally, upload the music you want, click on the proportion option, the best and click on export.
Prompt
The father smiles and gives the girl a plate on her shoulder. Their expressions radiate happiness and a strong bond. Typography: Peak works with bold, distressed textual content exploring “BEST DAD EVER” on the left with a candy subtitle: “My Hero, My Mentor, My Everything: Art Style: A vibrant virtual painting fashion with light pores and skin colored hair, centre white, and white text.” Textured, evocative backgrounds with splashes of pristine, yellow and white