Hello friends, welcome to another article. Today, in our topic, I will tell you how to create a colourful wedding invitation video professionally in Kinemaster. The topic is going to be very interesting, so read and learn completely. First, you need to prepare some photos and PNGs for his editing for the background. Then, open the Kinemaster application, it will give you the project name above, select 16:9, and click on create, which will directly take you to our gallery.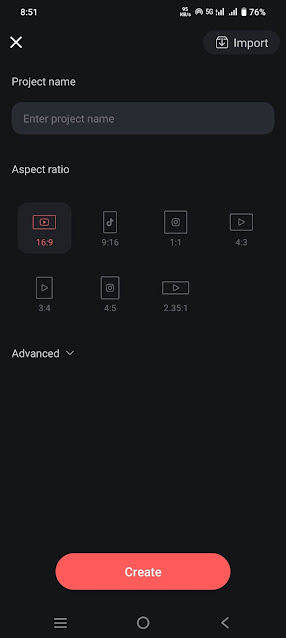 Here, add any colourful image or video you like, add the Vinayaka photo PNG image, tap on the video taken earlier, go to effects, apply the gas number, and then tap on that layer. Tap on effect and set strength 3 in settings. Track the image or video you take next as long as you want to create a video.
 Now that you have added a PNG image related to the Vinayaka photo, click on it and track it for 6 seconds. Now, click on that layer,r and on the right side, de we will have the transformer option. Click on it and click on its size. Add the keyframe and set it to 0.6, and come back.
 Now, if you want to add any other effect to that photo, then add a photo related to the leaves in the same way animation as said before, add from left to right or right to left as you like,e and give a blurry effect to that photo. After all, our title should be applied in such a way that it appears. With this, our first slide is complete.
 Then some titles need to be created, if not,ot we can create them in Kinemastese, and we can edit them very easily if we save the page image formats.
How to Create Titles in Kinemaster
First, you take Kinemaster’s new project and add an image or video then click on that image on the right side we have options, if we scroll down there we will see the option called background tap on it and click on the next transparent then come back now click on the same do that and click on the fan edge option then move it left or right now we have a transparent background ready..jpeg) Now, click on the layer and click on text. Now, we take a title and type something, then apply a phone sale and apply colour for that. After applying, the text should be animated by putting it horizontally in the centre. Now add dividers to whatever title is there, and there is a view option on the left side. Tap on i,t and tap on the capture and save option, and this image will be saved to our gallery in PNG format. If you want as many titles as you want, create all the titles and now open the main project of Kinemaster.
Now, click on the layer and click on text. Now, we take a title and type something, then apply a phone sale and apply colour for that. After applying, the text should be animated by putting it horizontally in the centre. Now add dividers to whatever title is there, and there is a view option on the left side. Tap on i,t and tap on the capture and save option, and this image will be saved to our gallery in PNG format. If you want as many titles as you want, create all the titles and now open the main project of Kinemaster. Now, whatever the created title is, add it as a layer under the second slide and click on it, and there is a transform option on the right side. After admitting this title, if there is anything you like on this side, leave PNG, add blur, and animate it as you like. Whenever you need to upload titles now among not the most effective but additionally to the left and right because you want to display them with images, so when you add images, you roll the left side image, and as you roll the right side image, you need to animate the same animation from the beginning than the default
 If you want to create a headline instead of an image, first assemble the introduction on one page, reproduce it, put it on the right page, duplicate it, and add as many as you want. It is enough to add the title. By doing this, the assignment video could be completed quickly.
 After the video is complete, click on the layer, and the sticker will have cinematic frames in the KineMaster store. Add red width to it and track how far the video is.
 Now add whatever you like, and the song will feed into the Kinemaster setting. It should also be enabled in the same way that the video will be fed as well. Enable it and export the video.
 You can also edit this video invitation in Light Motion, which is also easy with 4k quality. I will explain some points to you to follow and edit them first. Go to the Alight Motion app, and then you will see the plus icon. Click on i,t e typeproject na, name select reserreservationtake the background colour, and click on Create Interface will open. You will have many options here. You will see the plus icon again. Click on i,t, and bac grounbackgrounde should be taken, and now the blur effect should be applied to the background image.
.jpeg) For this, click on the apex option type blur, and enter. For images, you also have to click on the plus icon again, and you have to add this PNG image, and you have to add another effect to it. You can zoom in, zoom out, move, or rotate, and speed and slow editing can also be done with this tour. Apart from this, after editing one side completely, if you edit the rest of the slides in the same way, it will waste a lot of time. To make it easy for you, after completing one side, copy all the layers in that slide and paste them under the next slide, either text or photos. Just select a layer, and there is a colour and field option on the left side, click on it and click on the media option, and just reply or select a photo, video, or text from your gallery,y and the second slide will automatically be created for you easily. So after creating this, you can add cinematic friends or music later to this video.
For this, click on the apex option type blur, and enter. For images, you also have to click on the plus icon again, and you have to add this PNG image, and you have to add another effect to it. You can zoom in, zoom out, move, or rotate, and speed and slow editing can also be done with this tour. Apart from this, after editing one side completely, if you edit the rest of the slides in the same way, it will waste a lot of time. To make it easy for you, after completing one side, copy all the layers in that slide and paste them under the next slide, either text or photos. Just select a layer, and there is a colour and field option on the left side, click on it and click on the media option, and just reply or select a photo, video, or text from your gallery,y and the second slide will automatically be created for you easily. So after creating this, you can add cinematic friends or music later to this video. Then, when you export this vid,eo click on the share option and select high quality. Then, select the first option on the left side of the format, set the frame rate as high as possible, and also set the bit rate. Click on export now. It will take some time, then the save option will come. Click on the above button, and this video will be successfully saved to your gallery.