Kids’ photo editing has become a popular way to create memorable and visually appealing portraits. With the PicsArt app, you can design an attractive HD-quality photo by combining multiple images, creative elements, and stylish text. The process is simple and can be completed entirely on a mobile phone. In this tutorial, you will learn how to create a trending kids’ photo edit using PicsArt. Follow each step carefully to achieve a clean and professional result.
Gather the Required Files
Before starting the editing process, make sure you have the following items ready: The
- PicsArt app is installed on your mobile device
- A dark red lighting-effect background image
- One or more kids’ photos
- Stylish font styles
- Brush stroke PNG images
Once these files are ready, you can begin editing.
Open PicsArt and Start a New Project
Launch the PicsArt application on your mobile phone.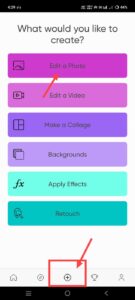 When the app opens, you will see several options at the bottom of the screen. Tap the Plus (+) icon located in the centre.
After tapping the Plus icon, several options will appear. Select Edit a Photo and choose your background image from the gallery.
Once the background image is added, you need to adjust its ratio.
Adjust the Background Ratio
At the bottom of the screen, tap Tools.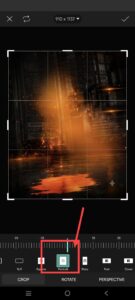 Inside the Tools section:
- Select Crop
- Choose the Portrait ratio
- Tap the checkmark in the top-right corner to confirm
Your background is now ready for the next step.
Add the First Kids Photo
Now it’s time to add your first photo. Swipe the bottom menu from right to left until you see the Add Photo option.
Tap Add Photo and select a kid’s photo from your gallery.
After adding the photo:
- Open the Effects option.
- Select the B&W category.
- Choose a black-and-white filter.
- Tap the checkmark to apply it.
Crop the Photo
After applying the black-and-white effect:
- Open the Crop tool.
- Select the Portrait ratio again.
- Confirm the crop.
Place this photo on the left side of the background.
This image will become the first photo in a vertical arrangement.
Add Additional Black-and-White Photos
Next, add two more photos using the same process.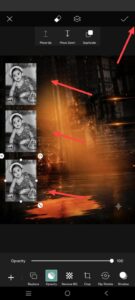
Add the Second Photo
Tap Add Photo again and select another image.
Repeat the following steps:
- Crop it using the Portrait ratio
- Apply the black-and-white effect
- Confirm the changes
Place this image directly below the first photo.
Add the Third Photo
Repeat the same process for the third image.
After adding and editing it:
- Position it below the second photo
- Align all three photos vertically on the left side
At this stage, you should have three black-and-white photos arranged in a neat column.
Add the Main Photo
Now add another photo that will become the main focus of the design.
Tap Add Photo again and select a different image from your gallery.
Unlike the previous images, this photo will be placed in the centre and displayed at a larger size.
Adjust the image until it becomes the primary visual element of the design.
Remove the Background from the Main Photo
To create a cleaner look, remove the background from the main photo.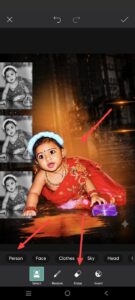
Using the Background Removal Tool
After selecting the photo:
- Open the Remove Background option
- Or use the Eraser Tool
Additional options will appear at the bottom.
- Select the Person option.
An active internet connection is required for this feature to work.
After the background is removed:
- Tap the Rightmark
- Adjust the photo position as needed
The main subject should now blend naturally with the background.
Add a Brush Stroke Effect
The next step is to add a brushstroke design behind the main photo.
Search for a Brush Stroke PNG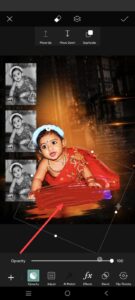
Open the Sticker option.
Inside Stickers:
- Tap Discover
- Use the search feature
- Search for Brush Stroke
You will find several brush stroke PNG designs.
Choose one that fits your design and place it behind the main photo.
Resize and position it carefully to create a balanced appearance.
Add Text to the Design
Text plays an important role in making the edit look complete.
Add the Name
Return to the main editing screen and select the Text option.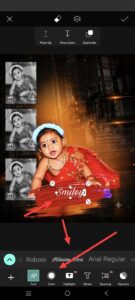 Type the desired name and confirm it.
After adding the text:
- Choose a font style
- Select a color
- Adjust the size
Place the name over the brush stroke design.
Add Additional Text
Create another text layer.
Depending on the photo:
- Add Little Boy if the photo is of a boy
- Add Little Girl if the photo is of a girl
Position this text above the name.
Add a Quote
You can also add another text layer on the right side.
Use any quotation-style text you prefer and align it properly within the design.
Enhance the Final Image
Once all elements are in place, you can improve the overall image quality.
Use the Enhance Tool
Return to the editing options and select Tools.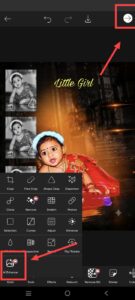 Inside Tools:
- Tap Enhance
An internet connection is required for this feature.
The enhancement process may take a few moments. Once completed, the image quality will be improved.
After processing:
- Tap the checkmark
- Continue to the save option
Save the Photo
To save the final image:
- Tap the checkmark in the top-right corner.
- Select the Save option.
Your edited photo will be saved to your device.
Alternative Editing Method Using AI Tools
There is also another way to create this type of photo edit more quickly.
You can use AI tools
To do this:
- Open AI Tool or App.
- Tap the Plus (+) icon.
- Select a photo from your gallery.
- Upload the image.
After uploading:
- Copy the prompt provided at the end of this article.
- Paste it below the uploaded photo.
- Submit the request.
The AI tool will process the image and generate the edited version.
Before submitting the prompt, make sure to replace details such as:
- Name
- Boy or Girl
with the information related to your own photo.
Once the image is generated, save it to your device.
Common Mistakes to Avoid
While editing, many users make small mistakes that affect the final result.
Some common issues include:
- Using low-quality photos
- Incorrect photo alignment
- Improper cropping
- Poor text placement
- Skipping background removal
- Not enhancing the final image
Review the entire design carefully before saving to ensure a polished result.
Conclusion
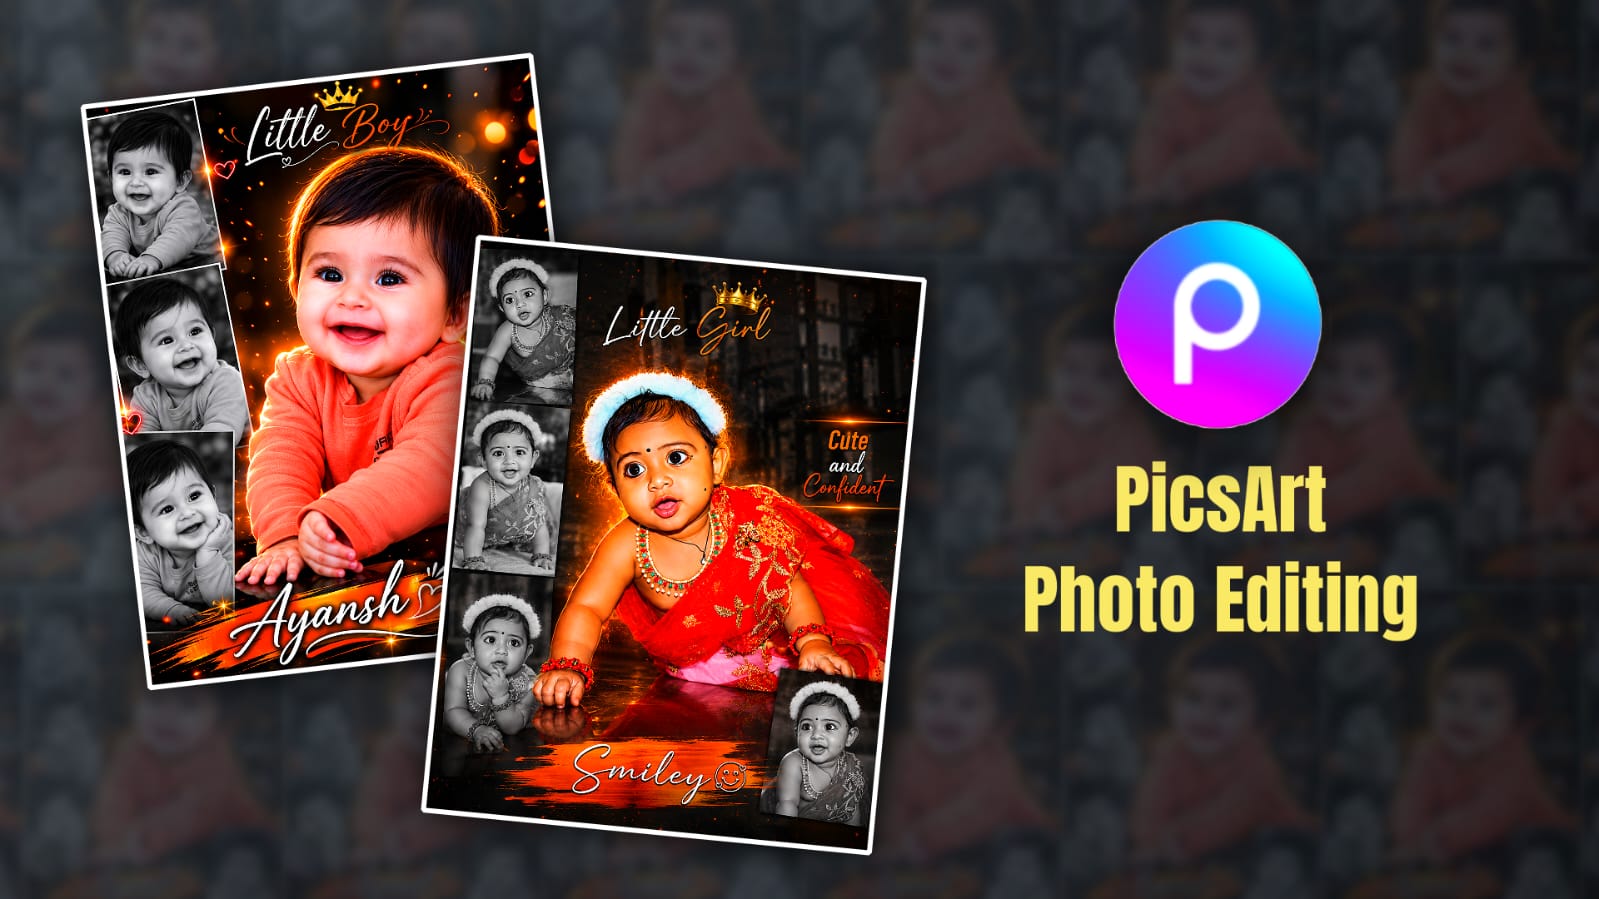
Creating an attractive kids’ photo edit in PicsArt is simple when you follow the correct process. By combining a dark background, black-and-white side portraits, a central cutout photo, brush stroke effects, and stylish typography, you can create a professional-looking design directly from your mobile phone.
Take your time with each step, make proper adjustments, and review the final result before saving. With careful editing, you can create a beautiful HD-quality photo that stands out.
Frequently Asked Questions (FAQ)
Which app is used in this tutorial?
This tutorial uses the PicsArt app for photo editing.
What type of background is required?
A dark red lighting-effect background is used for this design.
How many photos can be added?
The tutorial uses three black-and-white photos on the side and one larger photo in the centre.
How do I make a photo black and white?
Open the Effects section, select the B&W category, and apply a black-and-white filter.
Is the internet required for background removal?
Yes, an internet connection is required when using the Person option in the background removal tool.
What is the purpose of the brush stroke PNG?
The brush stroke PNG is placed behind the main photo to enhance the overall design.
How can I improve image quality?
You can use the Enhance tool available inside the Tools section of PicsArt.
Can this edit be created using AI tools?
Yes. The article also explains how the edit can be created using AI tools by uploading a photo and using a prompt.
How do I save the final photo?
Tap the checkmark, then choose Save to store the image on your device.
Use this prompt to generate a photo.
Create a premium cinematic baby poster using my uploaded photo. Keep the face, eyes, hairstyle, smile, skin tone, and outfit unchanged.
Layout: 1 large colour photo in the centre, 3 black-and-white photos on the left, 1 black-and-white photo at the bottom-right. Add orange-golden rim light, glowing outline, sparks, bokeh lights, cinematic particles, and a dark black background with orange highlights.
Text:
Top: “Little Boy” with a golden crown
Right: “Cute and Confident”
Bottom: “Name” on an orange brush-stroke banner
Style: Orange & Black theme, premium Photoshop edit, hyper-realistic, HDR lighting, sharp details, luxury baby poster, 8K quality, magazine-cover look, vertical 4:5 ratio. Match the reference poster composition, typography, lighting, and colour grading.
Hi, I’m Srikanth, the founder of Srikanth Digital Works. I concentrate on Photo, Video editing, visual design and virtual content creation. Through this website, I provide editing tutorials, suggestions, and industry insights to help builders enhance their virtual capabilities.