Hello friends, in this article, let us learn how to edit an Instagram DP or WhatsApp DP with our photo and name. It is very simple. For this, we can also use many AI tools, but without any need, I will tell you how to edit your favourite photo in the application you know on your mobile: the Alight Motion app. If we do this photo editing with AI tools, everything may not match the face properly, so we have to edit it in this mobile application.
Open the Alight Motion App
For this, first you open the Alight Motion application, after opening it, here we have to select the ratio, this ratio is for the DP, so here you can select 1:1 ratio, that is, square size, then you can name the title or project, if it is a text, write DP, then you have to select the background color and resolution, as high quality as possible, for example 2K or 4K, then you have to select the frame rate, we have nothing to do with it because it doesn’t matter how it is, it is photo editing, so click on Create Project and open it, the next enter page will open for us, as well as the timeline, but basically we only do video editing in this application, so we can also do photo editing using the options available in it, because all the options related to photo editing are also available in it. 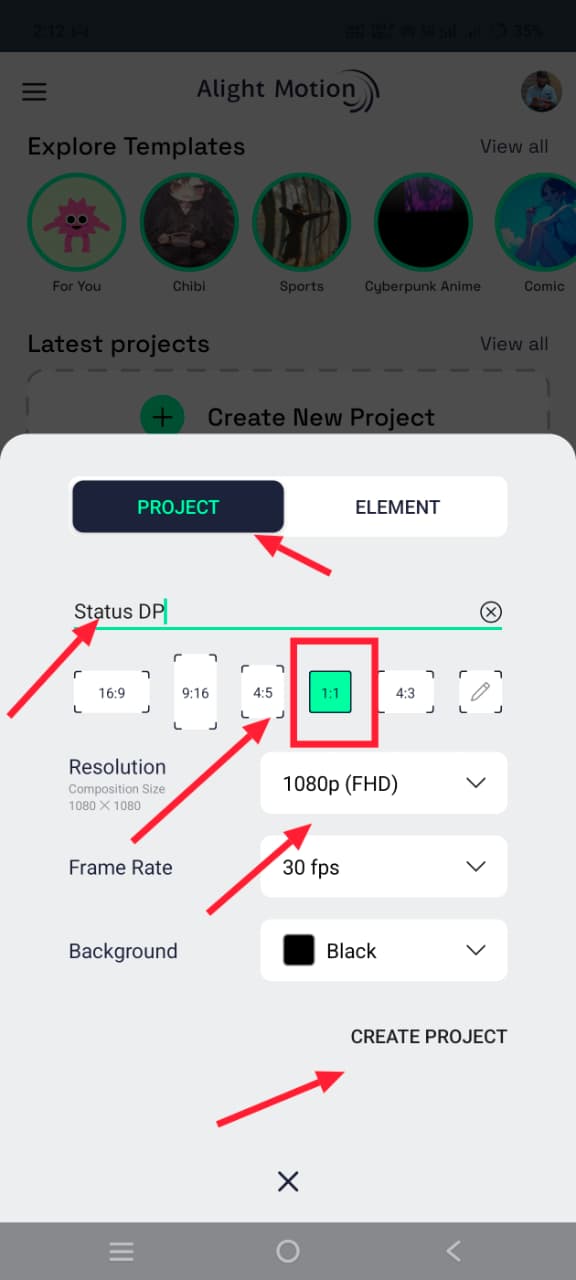 So let’s learn step by step; first, we have to add an image. For this, you don’t need to add any colour image in the background; otherwise, you need to take a shape. For this, simply click on the green plus icon; then there will be a shapes option.
 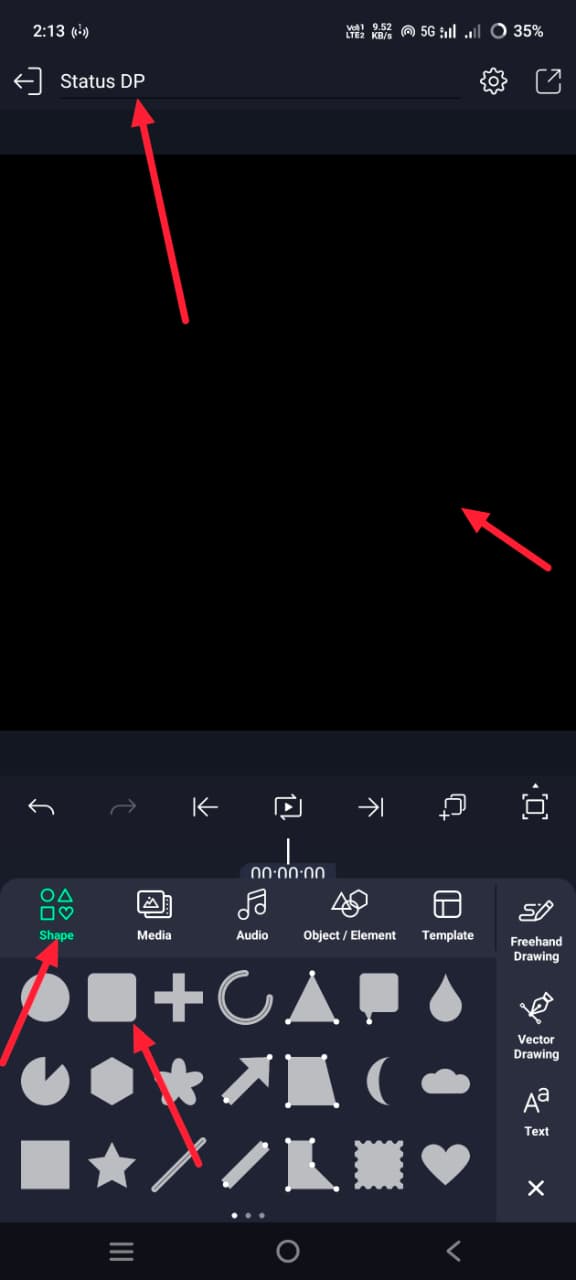 Click on it and take a square shape instead of a circle, and fit this shape to the screen. For this, simply click on the 3 locks on the top right side. Then, if you have options there, it will be called Composition Area. If you click on it, the screen will automatically fit. Now we need to apply another effect, so that is the colour. These colors. You need to choose a colour that is a little dark. For this, you need to click on this shape layer. Then, on the left side, there is a colour and fill option. Click on it. Then select a maroon or pink colour.
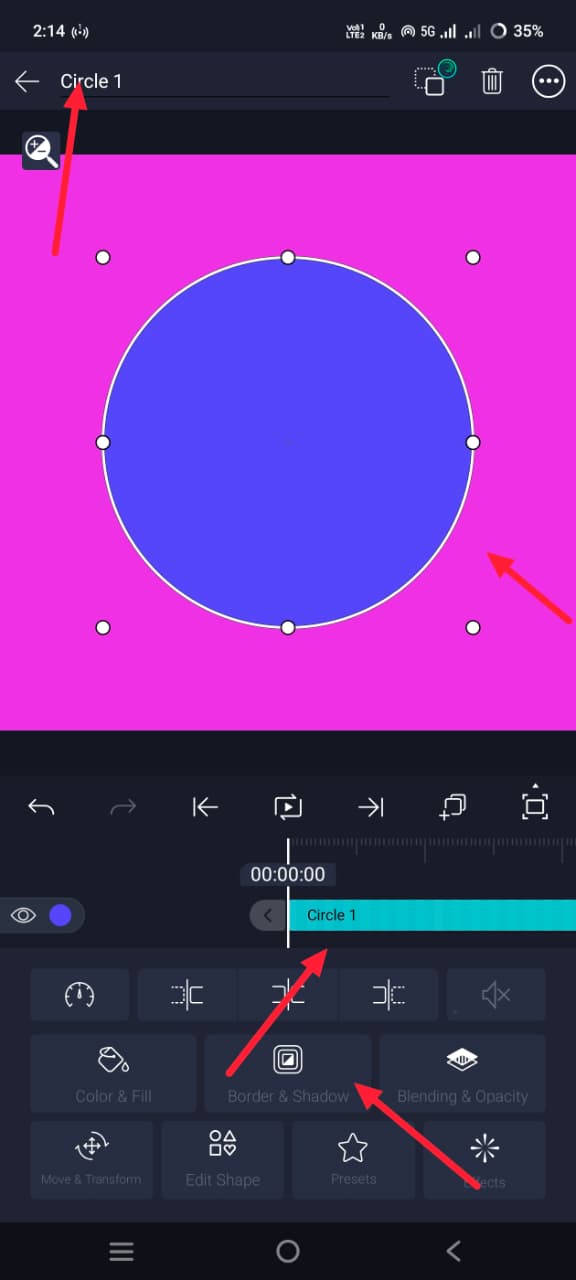 Now, to control the colours, you need to apply an effect to this layer. For this, click on the Effects option on the left side, click on the Add Effect option and set it to Gamma. You will get an effect. Click on it and add it. You can control the colours using the options in it. After that, you could as well mght want to take a round shape, which makes it look attractive. To do this, you will undoubtedly need to draw the circle you have done before. After taking it, it should also fit the screen so that the circle looks full. What you will do next is click on this circle, go to Effects again, click on Add Effect, and in Effects there is an option called Copy Background, which you have to add. Why is this option useful for us? In the background, this layer copies everything that we already have in the Photo Effects screen. These layers will appear. If you want to add any effect, if you apply it to this layer, it will automatically apply to everything. So now you need to apply an edge or stroke to this layer. For this, when you click on this layer, we will now see options and below there is a Blending and Stroke option. Click on it. There, you have to select Edge and increase the edge as much as you want, but as little as possible.
 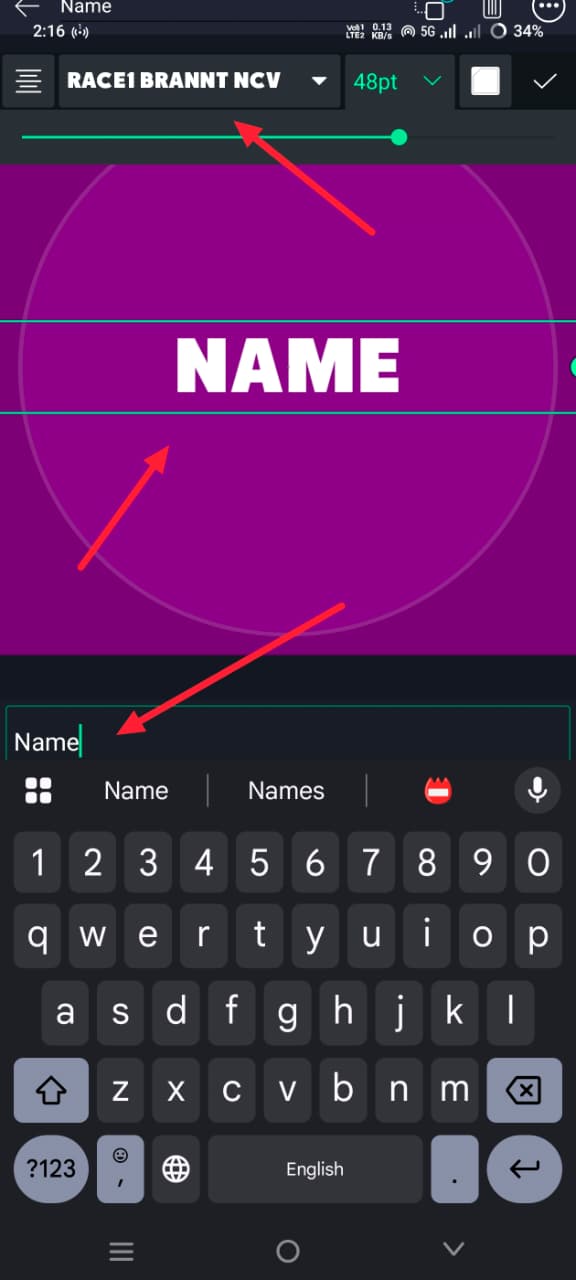 Now take a text and add your name to it. For this, you simply click on the green plus icon, click on the text option, and take the text. After taking the text here, click on Edit Text and add the name of your choice and enter it. After that, we have to add fonts, colours, and styles above and select the size. You need to add it in the centre of that screen. Add this text wherever you want.
Photo Adding
Now you have to add a photo, but you have to remove the background of this photo. 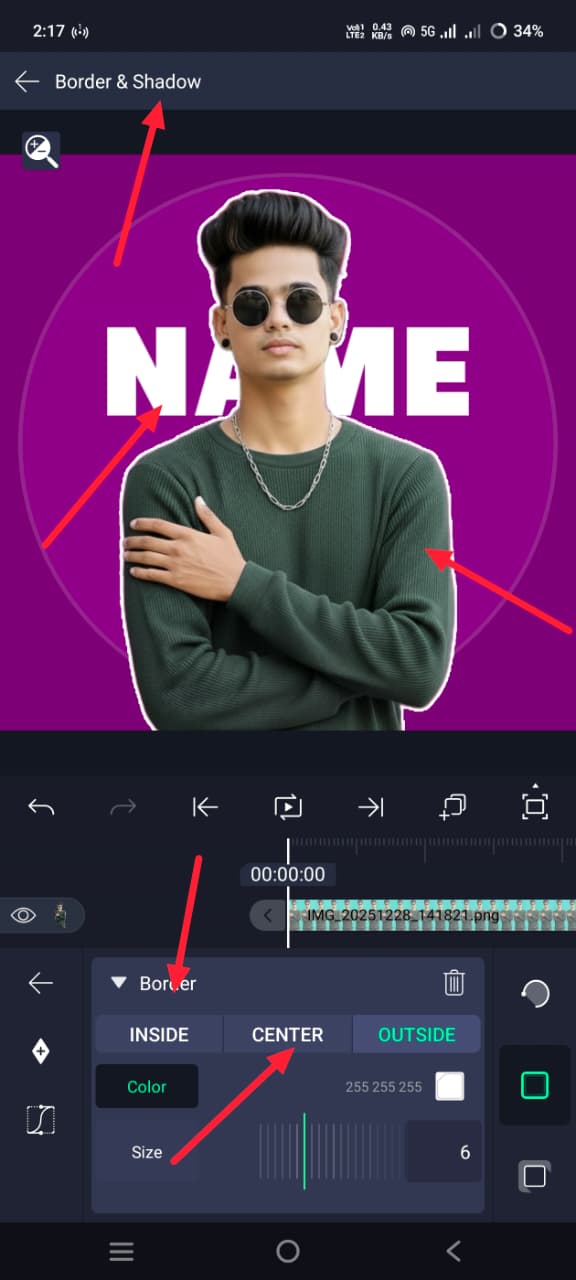 There are many websites and applications to remove the background of this photo. Some mobiles have free default apps. On mobiles, just click on the photo and hold it. You will have an option. If you click on the remove option, the photo will be automatically saved in a cutout format in PNG format. In any tool, you can tell the tool to remove the background, and it will automatically show or give you the background. You can save it. You have to add the photo you have made like this by clicking on the media option. After adding it, now apply the stroke edge to this photo again like the one we applied to a circle earlier and apply the colour to the stroke here. The colour should be white, or take it as plain white. Now, almost all photo editing is done.
Enhance Photo
Now, to increase the clarity of the photo, simply click on the image in the photo. Then click on the Effects option and click on Add Effect. There, search for Saturation and Sharpen in the effects.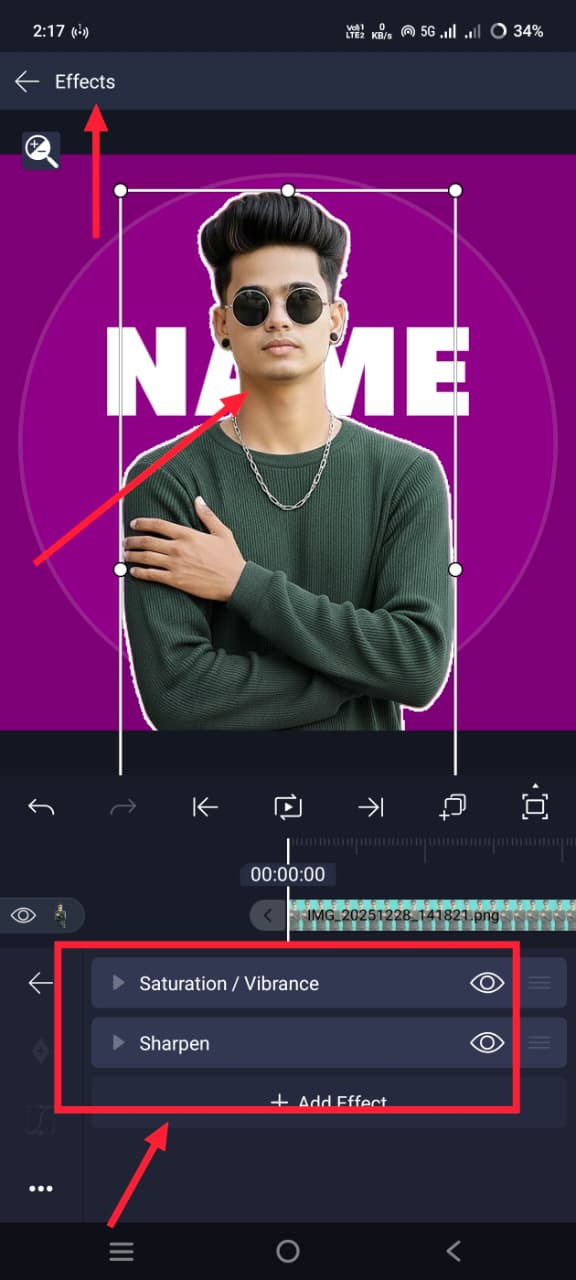 Increase the saturation colour because if you make a normal photo into colour, it looks a little better. Also, another effect here is that the more strength you put in it, the more HD the photo will become. So select the strength you want. After selecting this, if you want to add any other effects, just like many others, go to Effects, and there will be many effects there. If you want to add any other effect to the photo, colour effects, if that app also has everything, add the one you like. Now, in the beginning, we added a name in the background; if not, click on the name layer that was added in the background. Here, click on the blending opacity option and reduce the contrast because we need to add another name in the front. Click on the same name in the front as well. Plus, click on Add Text, add text, replace that text with your name, apply colour and font style, and then now set these tips in the front. Apply colours. If it is a colour font of your choice, if it is a little stylish and unique, if it is a trending font, then overall we will have a pretty font here. The final touch is that after adding all the photos, if you want to apply any blending effects, if there are any lighting effects or any other effects, add the images on the black screen and click on those images one by one and then click on the blending and positioning option, and you have to blend and set them in the position you want.
Export Photo
So after doing this, finally now we have to save this photo. For this, you click on the Share option on the left side; there, your resolution will already be set by default.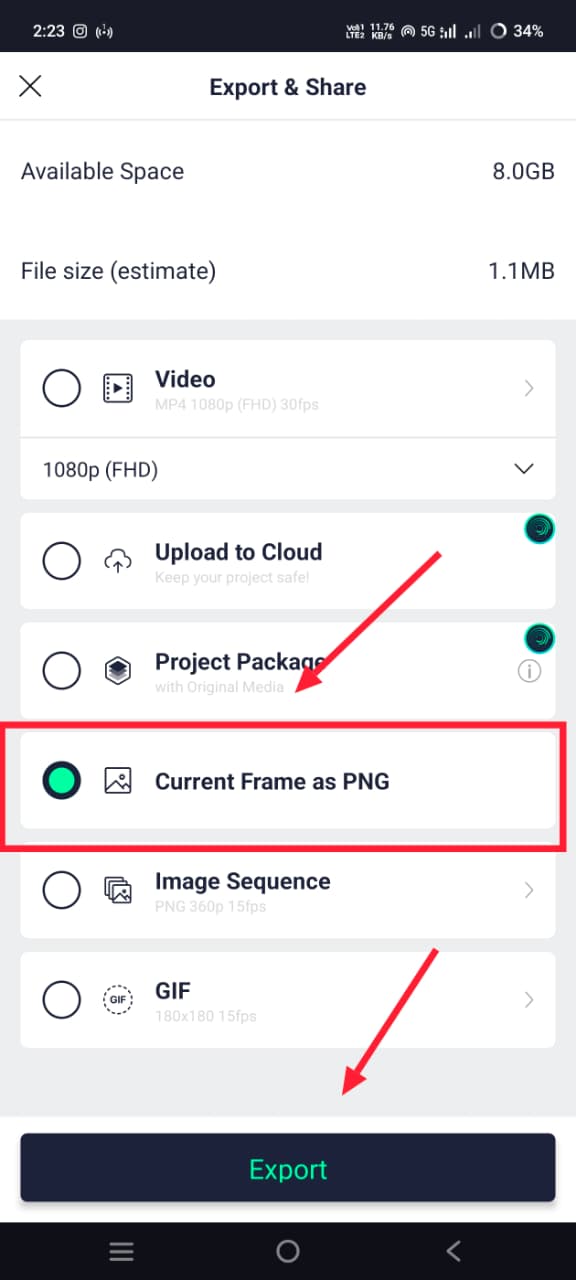 If you scroll down a little, you will see an option called Current Frame as PNG. Click on it, select it, then tap on Export Directly. This will be exported. Now click on Save Image and save the photo. This is the overall article. Like this, we can also do photo editing in this application.
Prompt
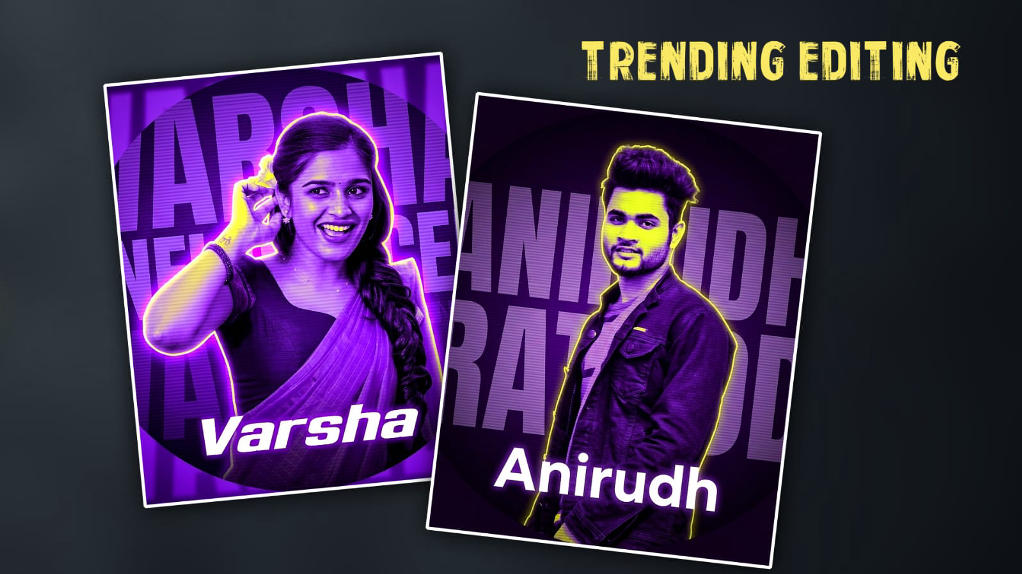
Create a high-quality circular profile picture using the provided image of a young man. Apply a strong monochromatic purple and neon yellow aesthetic theme. Add a glowing neon rim light around the subject. The background should contain large, translucent, bold block text saying “FULL NAME: with a stylish layered effect. Add a subtle horizontal CRT scanline texture overlay for a retro digital vibe. At the bottom centre, include sharp, modern white typography text: “Name” with a slight glow.
Hi, I’m Srikanth, the founder of Srikanth Digital Works. I concentrate on Photo, Video editing, visual design and virtual content creation. Through this website, I provide editing tutorials, suggestions, and industry insights to help builders enhance their virtual capabilities.