Hi friends, welcome to our next article. In this article, I will tell you how to edit a double-exposure photo professionally in HD on mobile. You can handle it without too much trouble. I actually defined it in a way that everyone could understand. So, you should read this blog article completely and edit the photo of your choice.
- To edit this photo, you need to have the Kinemaster application installed on your mobile.
- Then, select any background photo, plain white
- Then, select a lighting effect photo
- If you want to add text to this photo, you need some stylish fonts.
Create a Project in Kinemaster
First of all, what you will do is that this is usually a video editing application in which you can also edit photos. Let’s see how to use the options in it. First, open this application. After opening it, here you enter the ratio and project name. After selecting the ratio, here you are editing the ratio only. So here you also select the 4:5 ratio. This photo editing will be comfortable. Then click on Create Project. Then it will take us to the next page. There will be a layer option on the right side. Click on the option.
Adding Background Photo
Once you click on it, if you want background photos, there are many free background photos in this application.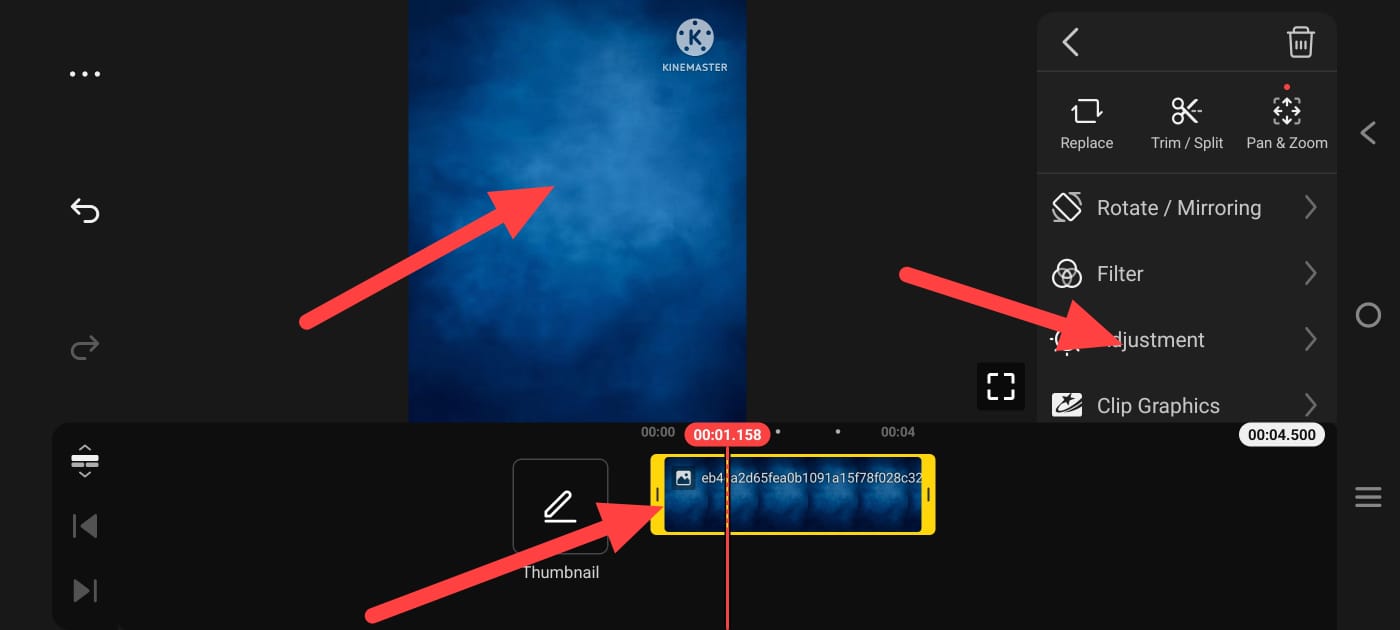 Select any photo you like from this. After selecting the photo, this photo should fill the screen. There are two settings to do this; first, one is manual; you can fit it directly with your finger, or there are some options on the right side. If you go to that setting, there is an option called Transform. By clicking on it, you can also reduce or increase the scale size. Now we need to apply a photo on top of this photo. For this, click on the layer option again on the right side; then there is the media option. Click on the video option there and select a photo from the gallery. After selecting, add that photo. It doesn’t matter if the photo background is not removed; add it directly.
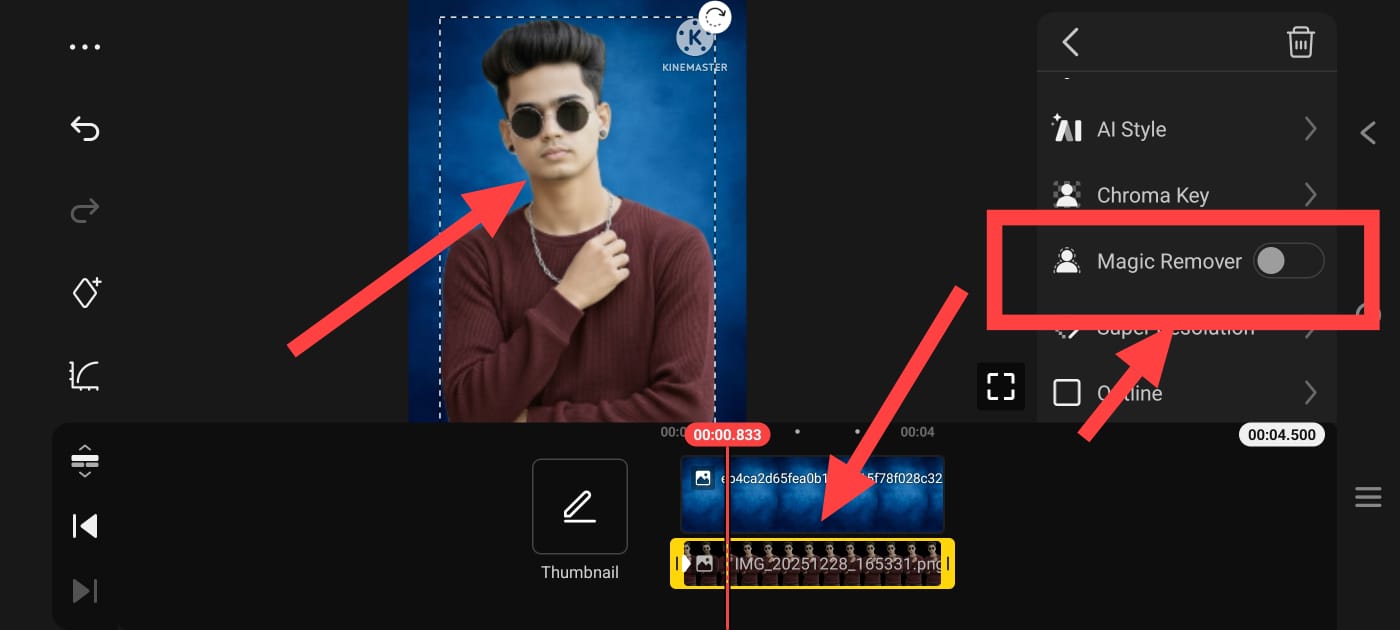 After adding it, we have an option in KineMaster that we have to remove the background. This option supports video and also supports photos. Where is it located? When you add a photo, click on that layer. When you click, you get a few options. If you scroll down to the right, there’s an option known as Magic Remover; Click on it. I think I did it; the automatic background will be removed. This is a place point best option. What I did now is apply smoothness to this photo and make the size larger, apply this photo not on the complete top but a little below, after applying it, what I did now is click on the image in this photo and go to the filters option and apply the black and white filter in it because we need this photo in black and white, the photo we will take later should be in color, only then will we see the look of the photos very well.
Lighting effect Apply
Next, you need to add another photo. First of all, you need to apply a lighting effect on your photo taken in the background.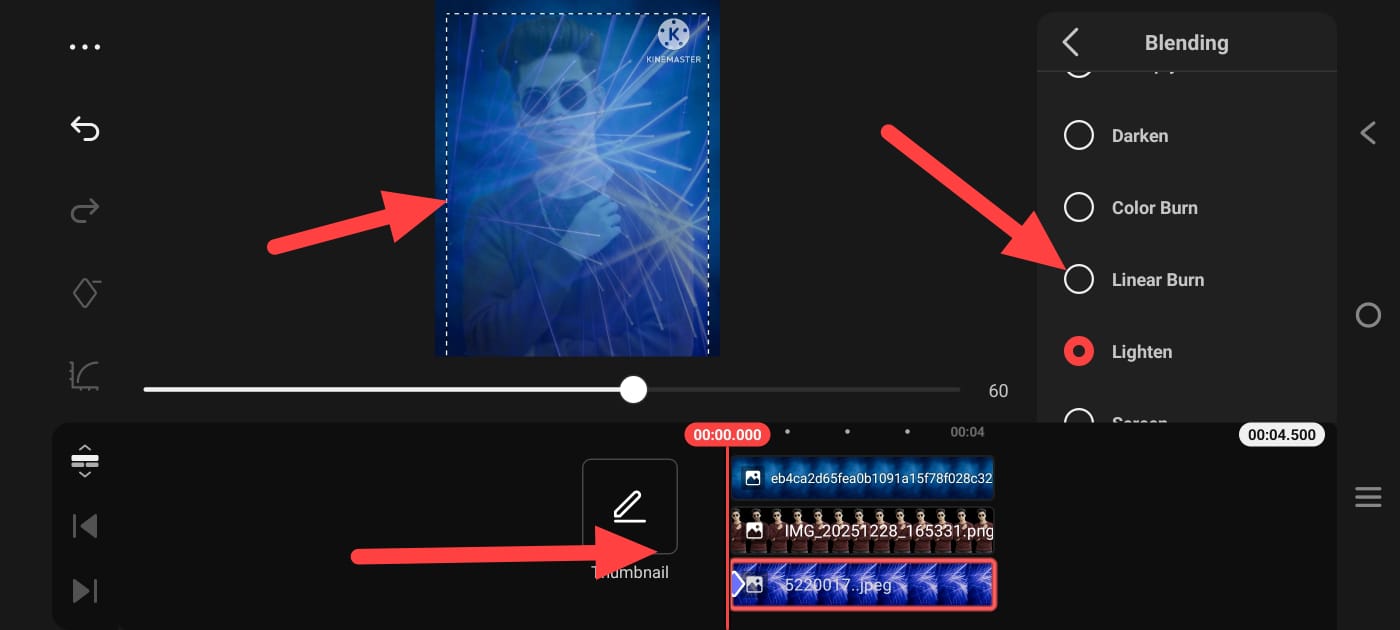 If you have this lighting effect photo, you can directly click on the media option and apply the photo. If it is on a black screen, you can click on the blending and opacity option, and there are many blending options in it. If you use options like screen or lighting, it will apply to you. Here, the effect screen as a whole should also be adjusted. Apart from that, if you do not have it, there are many effects in the same application, the Kinemaster application. You will also have a search bar there. If you go into it and search for a lighting effect, ima if you will get many images; just select it and apply it. Now, finally, you need to add your photo. Same as mentioned earlier, click on the layer option on the right side, then click on the Media option and select your photo. Take a full photo of this photo too. Here, after these photos are created, click on it, and there will be some options on the right side. If you scroll down, there will also be a background remover option here. Click on it. The background will be removed automatically. If you have already removed the background of this photo, there is no need to remove it.
Photo Quality Improvement
Now you need to keep this photo’s colour and then apply some HD effect to this photo.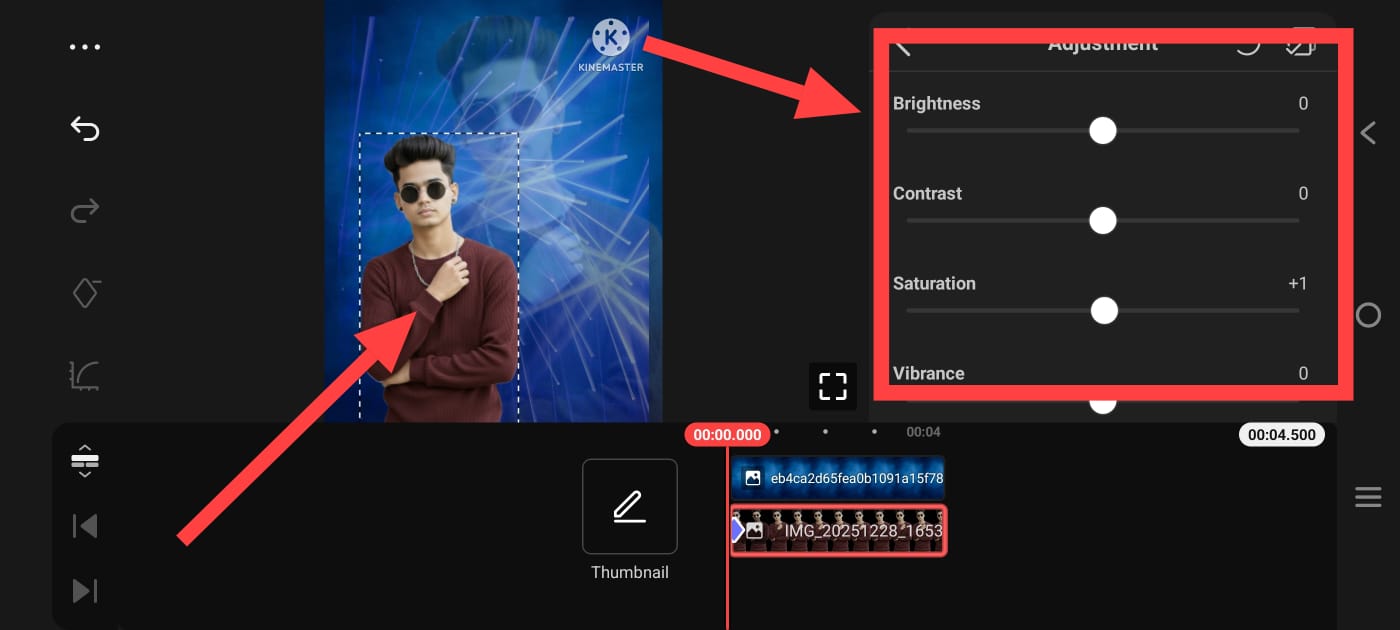 For this, we have a separate option called Enhance filters, but if we have some options on the right side, it will also be there: the Enhance options, OK and effects, but not all of them. If you want to add it simply manually, there will be some options on the right side. Go to the adjustment option, and you can also improve the photo quality through sharpness and brightness. In this way, almost all photo editing will be done.
Save Photo
If you do this finally, if you want to save this photo, you can place the cursor somewhere at that time, and then there will be a view option on the left side.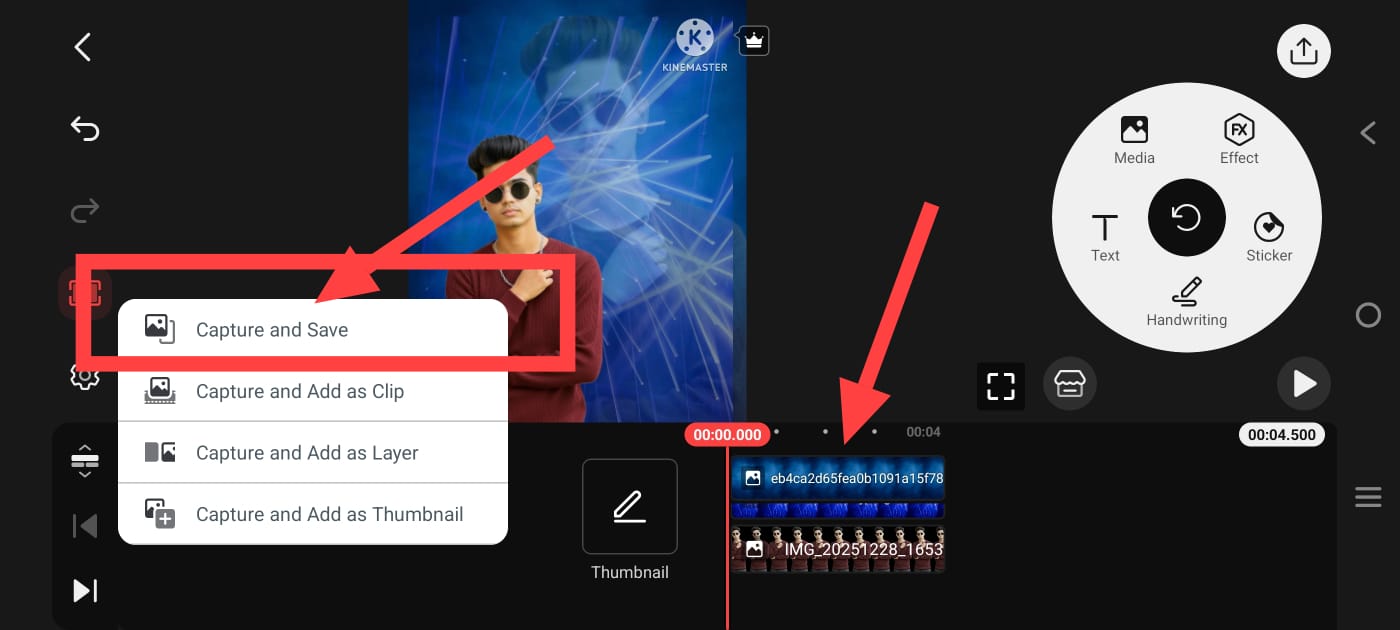 Click on it. Then there will be a capture and save option. When you click on it, that particular frame or photo will be saved to the gallery. In this way, we can edit photos, but we cannot edit them in high quality. You can use any other third-party application to enhance the photo, and you can easily edit it. You can edit with artificial intelligence tools; let’s see how it works. Simply open any tool and upload the photo you like, and without having to remove the background of that photo, you can simply edit that photo. Here, you are just giving an example, le as I said here. You have to give the text as you like. Upload the photo there,r e and if the photo in the photo I uploaded is blurry, add pixels and make it sharp, bright, smooth, and also change the background of the photo and edit it like a double-exposure photo. If you say the movie in Telugu or English in a way that makes sense to it, it will take some time to edit it. Then click on the photo and save it. In this way, we can edit the photo in both ways.
Prompt
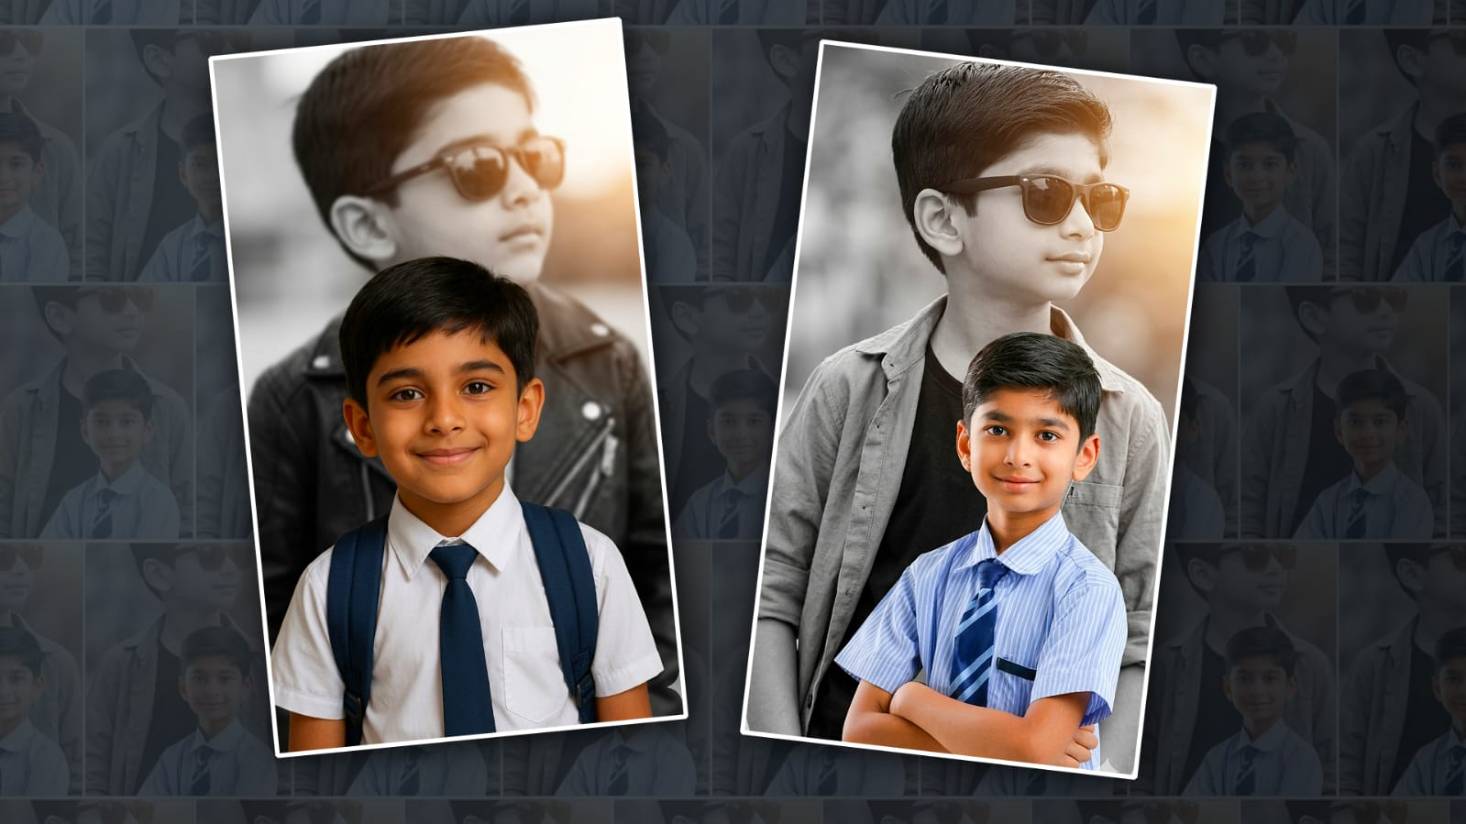
6-year-old Indian boy, face a hundred % identical to the reference image (no morphing, no alteration). Dual portrait composition. Background: massive monochrome portrait, assured pose, wearing shades, informal open blouse over darkish T-shirt, looking away from the camera, warm daylight flare from one side. Foreground: full-frame colour picture of the same boy on foot,t stylishly, state-of-the-art sunglasses, confident stride
Hi, I’m Srikanth, the founder of Srikanth Digital Works. I concentrate on Photo, Video editing, visual design and virtual content creation. Through this website, I provide editing tutorials, suggestions, and industry insights to help builders enhance their virtual capabilities.