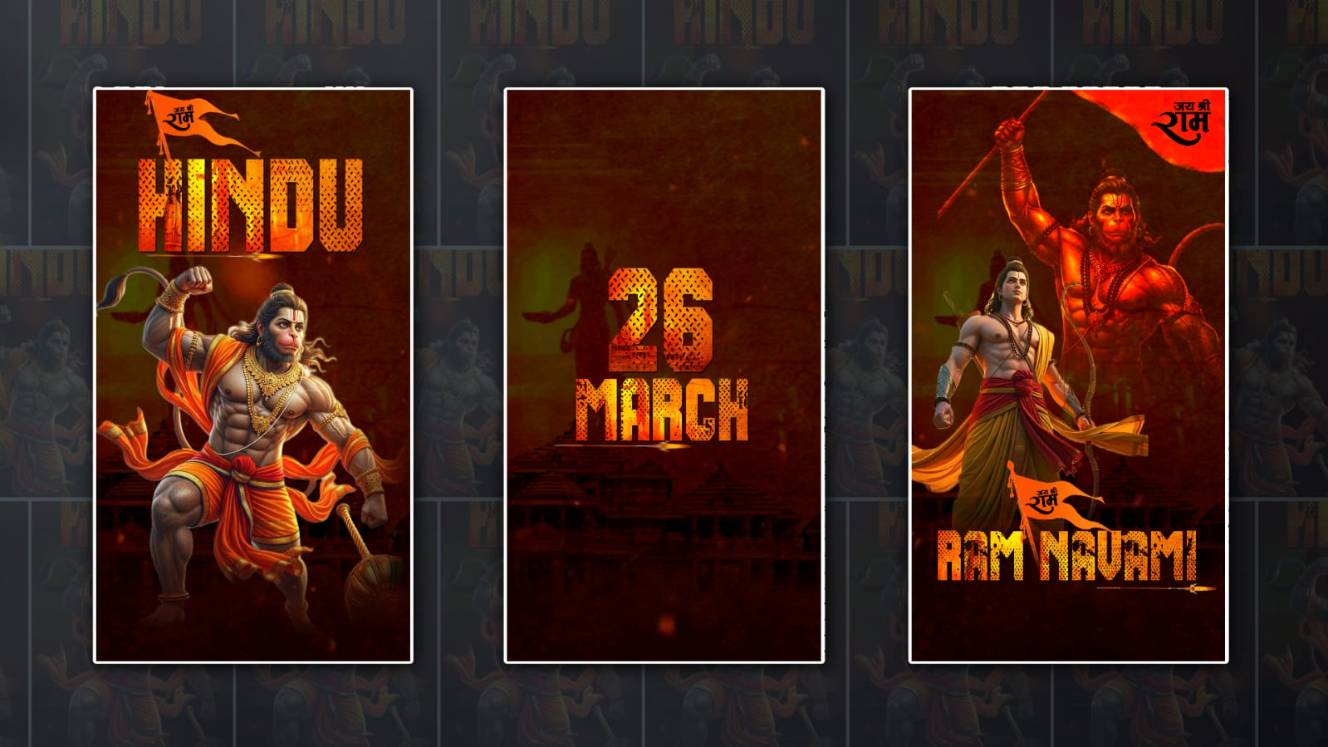
Hello everyone, welcome to our next article. In this article, I have told you how to edit Sri Ram Navami photo editing for the last time. In this article, I will explain to you how to edit Sri Ram Navami video editing to put the video in our status completely. The video is very easy. That too in the Alight Motion app. This app is very useful for video editing, and you can edit it easily and that too professionally. I will give you a step-by-step guide.
What is needed for this video editing
- For this editing, we need some good photos; for example, Anjaneya and Sri Ram. These two are okay; if there are some others.
- Then different ones should be worshipped.
- Also, add some good stylish font styles.
- The background video and the red particle clip should be on the black screen.
- Alight Motion app should be installed on your mobile,
So keep these ready. Now let’s start.
Create New Project
First, open the Alight Motion app. When you open it, there will be a plus icon in green colour. 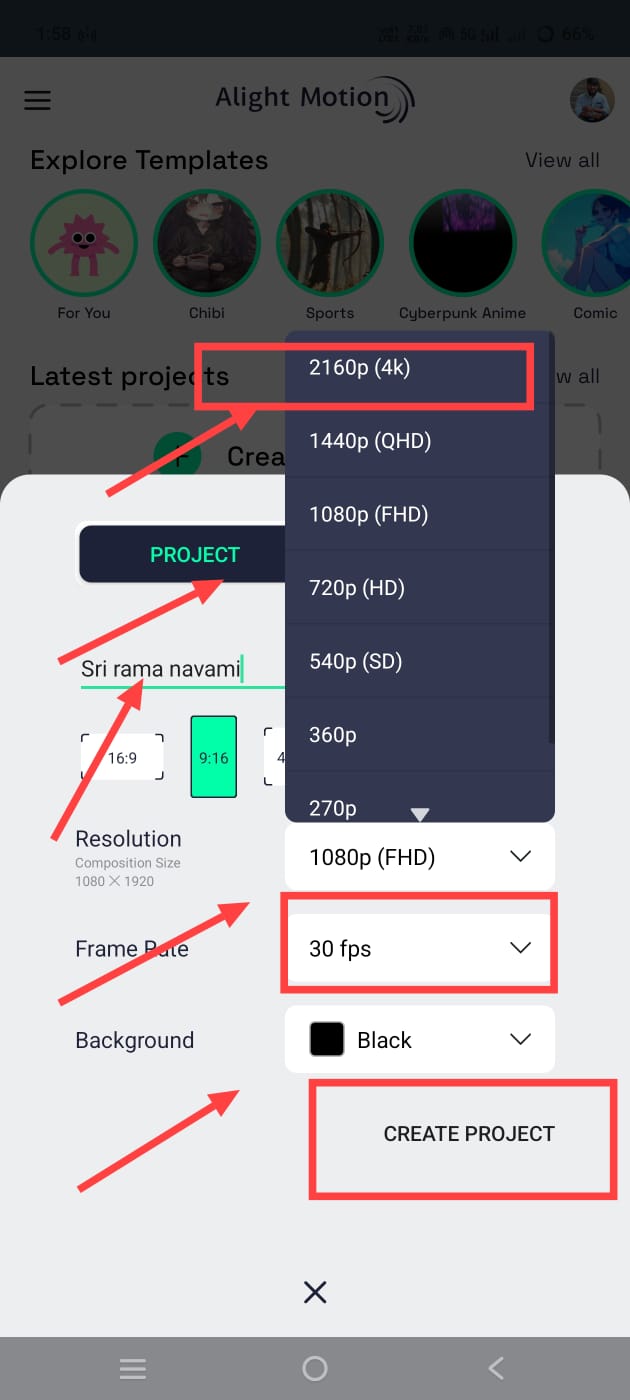 Click on the icon. Here you have to select the ratio. Here, you have to select the 16:9 ratio, i.e. for status or for Instagram Reels. Here, you have to set this ratio. Here, set the quality as high as possible. The frame rate should also be as high as possible. The bitrate should also be high. Then click on Create. By setting all these more, you will get a better video output. That’s why now you have to apply or add a background video here. For this, you click on the plus icon in green colour; then the gallery option will come. Click on it; it will take you directly to the gallery,
Background Photo Adding
Add a video or add a background photo; it doesn’t matter if you add it. Now you need to apply an effect to this video or photo. For that, come back and click on the green plus icon. Click on Add Effect, and there will be a tile option. Click on this option and add it. After adding it, in these options, enable the second option in these settings. After that, you need to reduce the brightness a little. For this, as told to many people, click on the Add Effect option and search there. Click on the effect that comes with brightness and open it. Again, you adjust here, and after applying the brightness adjustment, now you need to add another photo next and add any text along with this photo,
God Photo Adding
Let’s add the first god photo. For this, come back again, click on the green plus icon, click on the media option and add a photo.
 All the photos used in this should be in PNG format. Because if we do not remove the background in this, we cannot do professional editing, so take only photos with the background removed. Then, after adding that photo, make adjustments to the photo. Since we also have to edit in 3D, you need to give this photo a 3D effect, but before that, give a 3D effect to the photo that is taken in the background. This 3D effect means that you do not need to add the effect separately.
Camera Effect
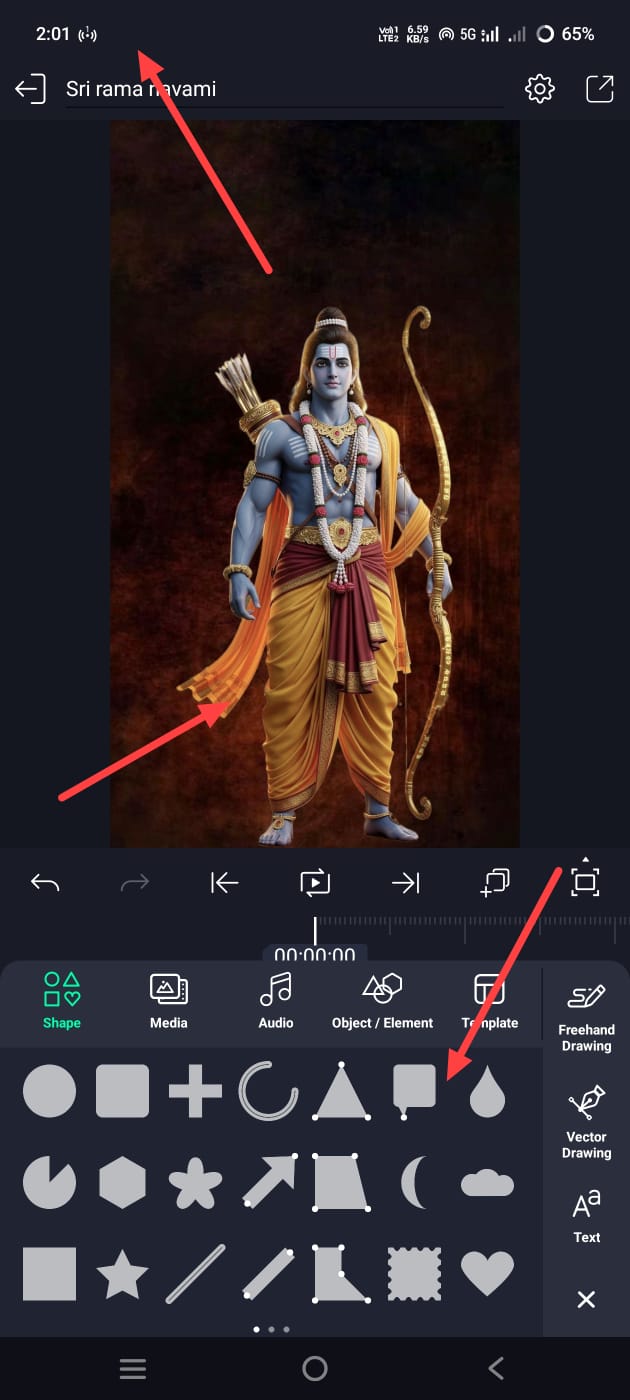
Simply come back and click on the green plus sign,gn and then some options will appear on it.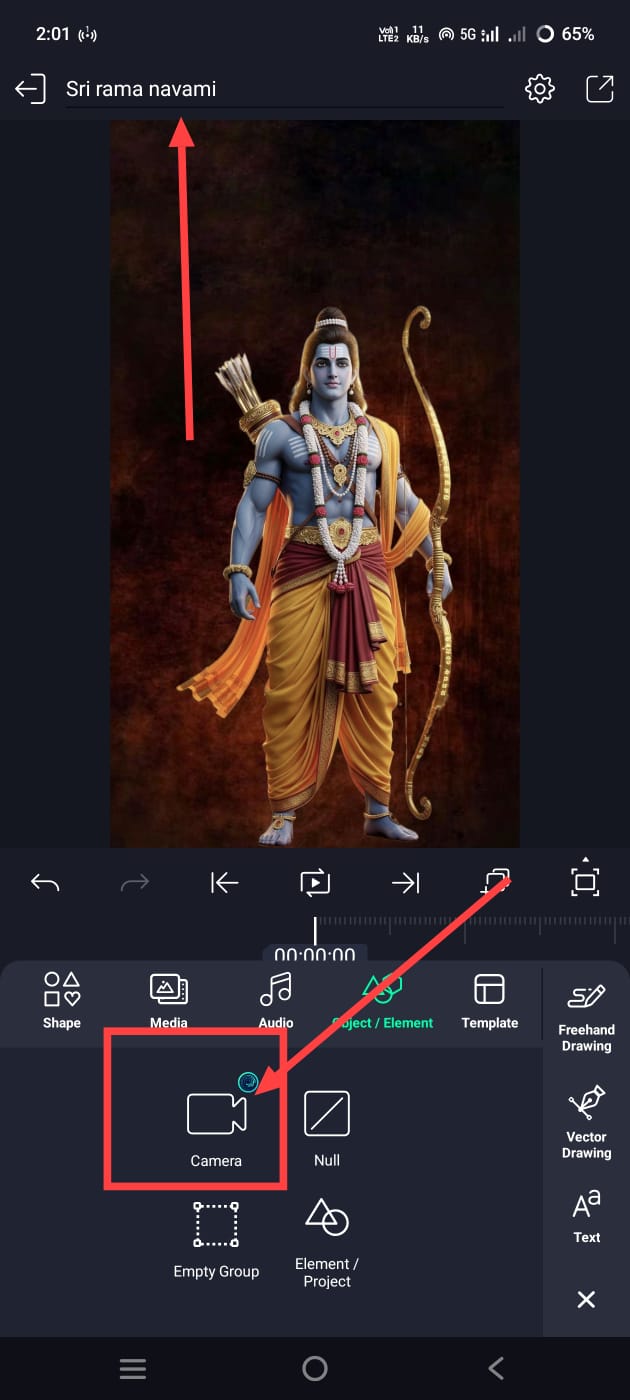 Shapes, Media Elements and other options will appear. Click on the Elements option. There will be a camera option in it. Click on it. It will directly apply the camera to all the layers. Here, the main thing to remember is that you want to create a video duration. Set the duration of the video you took for all of them. Set the duration of the photo or video taken as the background. Now the camera will also go automatically and set the duration to that extent. Now you need to apply the 3D effect to the photos in the background as well as the photos taken above. For this, if you want to add a 3D effect, simply click on the layer and on the left side there will be a Move and Transform option. Click on it. There you will have three options: X, Y, Z. The last option is Z. Click on it, and you will add the 3D effect to the extent. Add what you want to do. For example, when adding a background photo or video, you should take more, so you should also add everything that is on it. So, what is taken in the background should be more, and everything that comes later should be taken less. Now, if there is no photo added on top of this background video or photo, select it and apply the same TD effect as before. Here, you only need to put a number. First, take 9000 for it. Now, take eight thousand or seven thousand for what you added. After doing this, complete it with a slide.
Sri Rama Navami text add.
Now, you need to apply text along with this photo. For this, come back and click on the green plus sign and click on Add Text.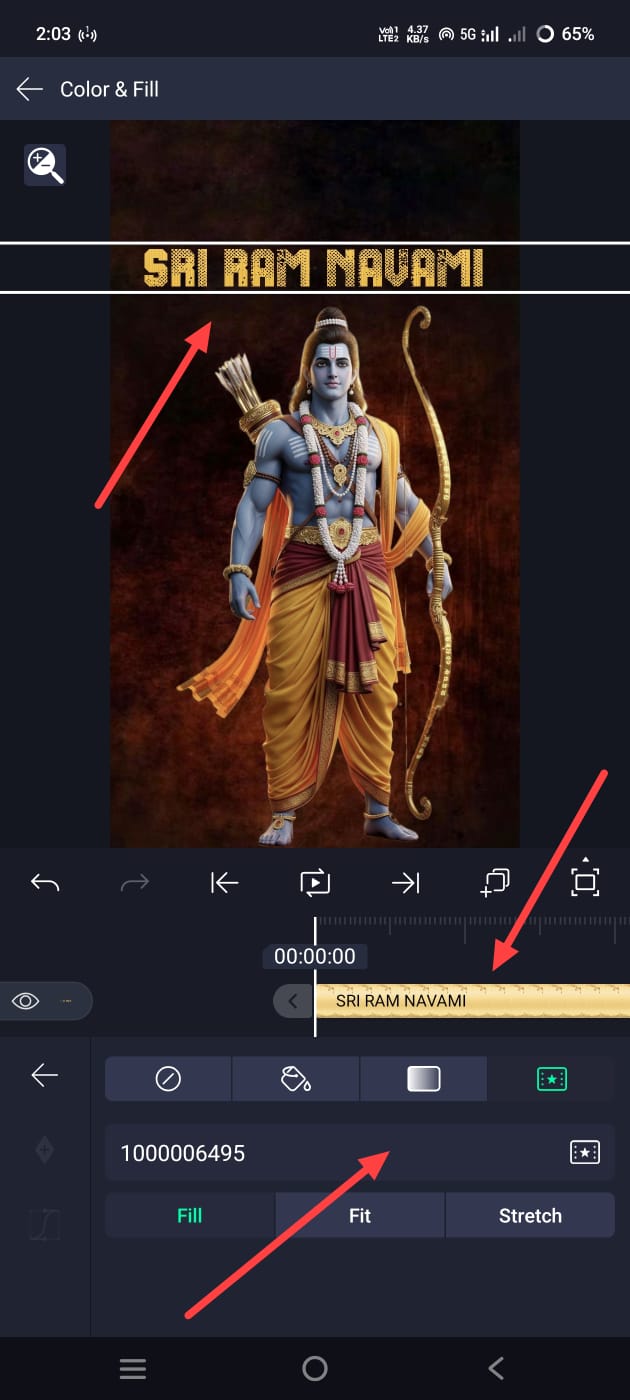 Now add the font style and colour size to this text and make adjustments to it. Here, you need to apply texture to this text, that is, apply images instead of colours in the photo. For this, simply come back and click on the text layer you just made. Then, on the left side, there will be a colour and fill option. Click on this option. After clicking, you will have a media option. Click on the option and add text of your choice, such as a plain or golden colour. Add it and make adjustments there. Now it will be applied. Now, after adjusting this text, the slide will be complete. In the next slide, you need to add a date. Along with the date, you can also add a photo if possible. Let’s add the date first. For a separate slide, take a text and change the date in the same way as you took it before. After adding the date, add a text like Sri Rama Navami in the next slide. For this, in English, you need to take the text as mentioned in the same starting. You also need to take a photo.
More God Photos Adding
Here, you need to take two photos, one of Anjaneya Swamy and the other of Rama.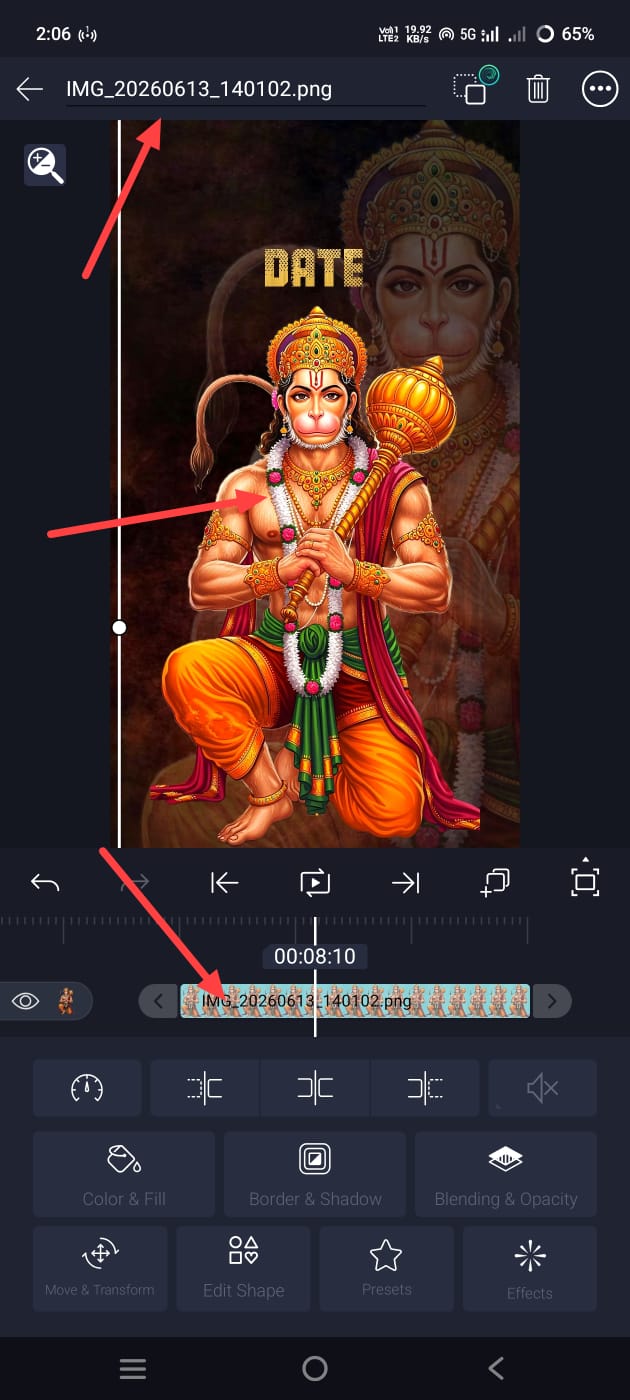 After taking the photos of both of them, apply some effects to these photos to increase their HD quality. We use the effects that we use regularly, such as brightness, saturation, sharpness, gamma, and add these and make adjustments. The colour and quality of your photo will improve. After that, apply a 3D effect to all the text in these photos as well as this technique. As mentioned at the start, go to the Move and Transfer option. Then click on the Z option and apply the 3D effect. After that, edit the whole thing completely, finally. Add music. For this, come back and click on the green plus sign and click on the audio option. Take a track or audio from the gallery and adjust the audio to the extent you want to create the video. Then finally check everything once because the common mistakes are that the layers and slides, transitions, and alignment are not done correctly, so the video does not output properly. These are the mistakes that many people make. Also, the quality of photos cannot be improved. The background cannot be removed properly. The photo or text cannot be added at the correct timing. These small mistakes make our video lose its professional look. If you want to save it later, you can tap the share option on the right side and select the quality you like here. Then export, and that’s it.
Font Download
AM Project Import
Hi, I’m Srikanth, the founder of Srikanth Digital Works. I concentrate on Photo, Video editing, visual design and virtual content creation. Through this website, I provide editing tutorials, suggestions, and industry insights to help builders enhance their virtual capabilities.