Introduction
3D lyrical videos are currently very popular for WhatsApp status updates, Instagram stories, and social media sharing. With the Alight Motion app, you can create a professional-looking 3D lyrical video using your favourite photos, song lyrics, and simple effects. In this tutorial, I will explain the complete process step by step so that you can easily create your own video. Read the article carefully and follow each step to achieve the best results.
Gather Some Files
Before starting the editing process, make sure you have the following materials ready: The
- Alight Motion app is installed on your mobile device
- A few flower images
- A lyrical song
- Two stylish fonts
- Five or more photos with the background removed
- 6 or 7 of your own PNG-format photos
Once everything is ready, you can begin editing.
Create a New Project
Open the Alight Motion app on your mobile phone.
Create a new project and select the following settings:
- Aspect Ratio: 16:9
- High Quality settings
- Preferred resolution
- Frame rate
- Bitrate
After selecting the settings, tap Create Project to enter the editing workspace.
Add Flower Images to the Background
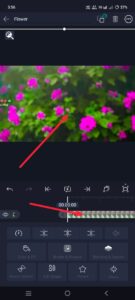 The first step is to add flower images to the background.
- Tap the green Plus (+) icon.
- Select Media.
- Choose a flower image from your gallery and add it to the timeline.
Apply a 3D Effect
To create a 3D look: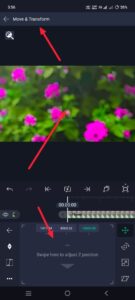
- Select the flower image layer.
- Open Move & Transform.
- Use the Z option from the X, Y, and Z controls.
- Set the first image to approximately 10,000.
- For additional flower layers, reduce the value by 2,000 or 3,000.
Repeat the same process for all flower images.
Add Blur to the Background
After applying the 3D effect: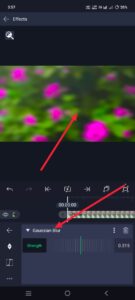
- Select the image layer.
- Open Effects.
- Tap Add Effect.
- Search for Gaussian Blur.
- Apply the standard settings.
- Keep the blur strength low for a subtle effect.
This helps create depth in the background.
Add the Song
Before adding photos and lyrics, add the music track.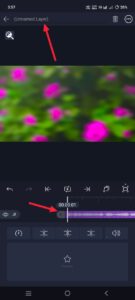
- Return to the main editing screen.
- Tap the Music option.
- Select your lyrical song.
- Add it to the timeline.
If you are creating a status video, a duration of around 30 seconds is enough. Remove any extra portion of the audio if necessary.
Add Your Photos
Now it’s time to add your photos.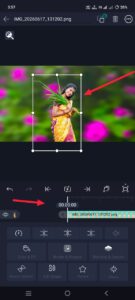
- Tap the green Plus (+) icon.
- Select Media.
- Import a photo from your gallery.
Make sure the background has already been removed from the photo.
You can use five or more photos throughout the video.
Improve Photo Quality
To improve the appearance of the image:
- Select the photo layer.
- Open Effects.
- Tap Add Effect.
- Search for effects related to colour correction.
You can use effects such as:
- Saturation
- Brightness
Adjust them carefully to improve image quality.
Apply a 3D Effect to the Photo
After improving the image quality: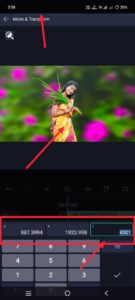
- Open Move & Transform.
- Use the Z option.
- Set the value to approximately 8000.
- Adjust the position until the photo fits properly on the screen.
Add Lyrics to the Video
After setting up the photo, you can begin adding lyrics.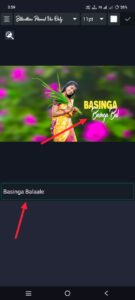
- Tap the green Plus (+) icon.
- Select Add Text.
- Type the first lyric line.
Customize the Text
After entering the lyrics:
- Adjust the font style
- Change the font size
- Choose the text colour
All these options are available at the top of the screen.
Import Custom Fonts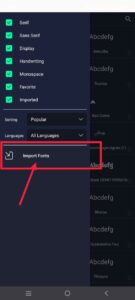
If you want to use your own fonts:
- Open View All Fonts.
- Tap the three-line menu on the left side.
- Scroll down and select Import Fonts.
- Choose a font from your mobile storage.
Apply the font to the lyric text.
Create a Second Lyric Style
To make the lyrics more attractive:
- Duplicate the existing text layer.
- Change colour.
- Apply a different font style.
This creates variation between lyric lines.
Apply a 3D Effect to the Lyrics
To match the 3D theme of the video:
- Select each lyric layer.
- Open Move & Transform.
- Use the Z option.
- Set the value to approximately 5000.
- Adjust the positioning as required.
Repeat this process for all lyric layers.
Applying the 3D effect to every lyric helps create a more professional appearance.
Add a Camera Layer
The camera layer is used to create a 3D animation.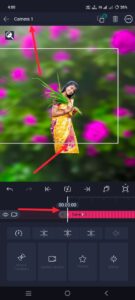
Insert the Camera Layer
- Tap the green Plus (+) icon.
- Select Elements.
- Choose Camera.
The camera layer will be added across the timeline.
Trim the layer so that it covers only the required section of the video.
Create Camera Animation
- Select the camera layer.
- Open Move & Transform.
- Use the Z option for animation.
Using the Z control creates a 3D movement effect throughout the slide.
Preview the Animation
To preview the animation: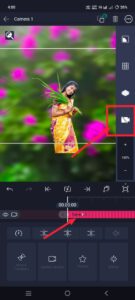
- Tap the View option.
- Select the camera symbol.
You can now watch the preview and check the animation.
Duplicate Slides for Faster Editing
Creating every slide from scratch can take a lot of time.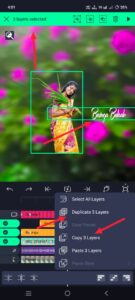 Instead:
- Copy the existing photo and lyric layers.
- Paste them into the next section of the timeline.
After pasting:
- Delete the old lyric text
- Listen to the song
- Type the new lyric line
All previously applied effects and settings will remain unchanged.
Replace Photos
If you want to use a different image: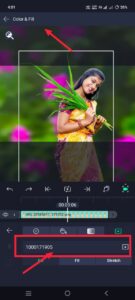
- Select the existing photo layer.
- Open Colour & Fill.
- Choose Gallery.
- Select a new photo.
The photo will automatically replace the previous one.
Repeat the process throughout the video until the entire 30-second project is completed.
Common Mistakes to Avoid
Many users experience quality issues due to minor mistakes.
Some common problems include:
- Not removing the photo background properly
- Incorrect timing of lyrics
- Incorrect timing of photos
- Poor image quality
- Failing to check the final preview
These mistakes can reduce the overall quality and professional appearance of the final video.
Before exporting, review the entire project carefully.
Export the Final Video
Once everything is completed:
- Tap the Share option in the top-right corner.
- Review the resolution settings.
- Check the frame rate.
- Export the video.
Your 3D lyrical video is now ready.
Frequently Asked Questions (FAQ)
Which aspect ratio should I select?
Use the 16:9 aspect ratio when creating this 3D lyrical video.
How many photos should I use?
You can use five or more photos, depending on your preference.
Which effect is used to blur the background?
The Gaussian Blur effect is used for creating a soft, blurred background.
How do I create the 3D effect?
The 3D effect is created using the Z option inside the Move & Transform settings.
Can I use custom fonts?
Yes. You can import fonts using the Import Fonts option available inside the font section.
How can I preview the camera animation?
Open the View option and tap the camera symbol to preview the animation.
Conclusion
Creating a 3D trending lyrical video in Alight Motion is simple when you follow the correct process. By combining flower backgrounds, 3D effects, custom fonts, song lyrics, and camera animations, you can create a professional-looking lyrical status video using your favourite photos. Make sure all timings, effects, and image quality settings are checked carefully before exporting to achieve the best results.
Fonts Download
Music Download
AM Project Import
Hi, I’m Srikanth, the founder of Srikanth Digital Works. I concentrate on Photo, Video editing, visual design and virtual content creation. Through this website, I provide editing tutorials, suggestions, and industry insights to help builders enhance their virtual capabilities.