Introduction
Name Art Photo Editing is one of the most popular editing trends on social media today. These edits combine multiple photos, stylish typography, attractive backgrounds, and creative effects to create a unique and professional-looking design. Many people use AI tools to create this type of editing, but it can also be done manually using the Alight Motion app on a mobile phone.
The best thing about this editing style is that you can create personalised designs for yourself, your friends, family members, or relatives. You can customise the name, photos, colours, and effects according to your preference. In this article, you will learn the complete process of creating a trending Name Art Photo Editing design using Alight Motion. Follow each step carefully, and you will be able to create an impressive photo edit without using a computer.
Requirements for Name Art Photo Editing
Before starting the editing process, make sure you have the following materials ready: The
- Alight Motion application is installed on your mobile device
- Four to five photos for the clone-style effect
- A cinematic texture background image
- A dark red vintage-style background image
- Stylish English fonts for the name design
- PNG photos with removed backgrounds
- Additional black-screen effect images, if you want extra effects
Once all these resources are prepared, you can begin the editing process.
Create a New Project
Open the Alight Motion application on your mobile phone. After opening the app, tap the Create Project option.
Select the ratio according to your preference. Choose a black or white background colour and enter a project name. Once the settings are completed, tap the Create button.
A new project timeline will open, and you will be ready to start building your Name Art Photo Editing design.
Add the Background Image
The background is one of the most important elements in this editing style. A good background helps make the final design look more attractive and professional.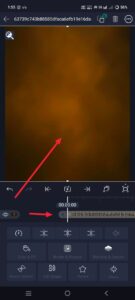 Tap the green Plus (+) button and select the Media option. Choose a cinematic texture background image from your gallery and add it to the project.
After adding the background image, you need to fit it properly on the screen. There are two simple methods for doing this.
The first method is to use the Move and Transform option and manually adjust the image size.
The second method is to tap the three-dot menu in the upper-right corner and select Fill Composition Area. This option automatically fits the image to the screen.
Enhance the Background
Once the background is added, you can improve its appearance by applying some colour-related effects.
Select the background layer and tap the Effects option. Then choose Add Effect.
You can apply effects such as Saturation, Gamma, and Brightness. These effects help improve the colours and overall appearance of the background image.
Make adjustments according to your preference until the background looks visually appealing.
Add the First Photo
Now it is time to add the first photo to the design.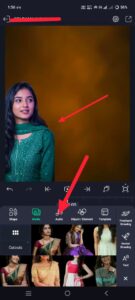 Tap the green Plus (+) button again and select Media. Choose a PNG photo with the background removed and add it to the project.
Position the photo on the left side of the design. Using PNG photos creates a cleaner appearance and helps achieve a more professional result.
Carefully adjust the size and position of the photo before moving to the next step.
Improve Photo Quality
After placing the photo, you can improve its quality using the effects available in Alight Motion.
Select the photo layer and open the Effects option. Tap Add Effect and search for quality-enhancing effects.
Apply suitable effects that help improve clarity and visual appearance. Adjust the settings until the photo blends naturally with the background.
This step helps create a polished and professional look.
Adding Additional Photos
This editing style uses multiple photos to create a clone-like appearance.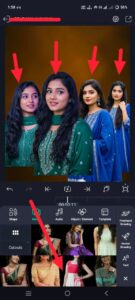 Tap the Plus (+) button again, select Media, and add another PNG photo. Position it next to the first photo.
Repeat the same process for all remaining photos.
A common arrangement is:
- Two photos on the left side
- Two photos on the right side
- One main photo in the centre
This layout creates a balanced and professional composition.
Make sure each photo is properly aligned before proceeding.
Apply Quality Effects to All Photos
To maintain consistency throughout the design, apply the same quality improvements to all photos.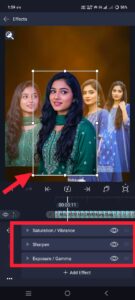 Select each photo layer individually and add the same quality-enhancing effects that were used earlier.
This ensures that every photo has a similar appearance and blends smoothly with the overall design.
Consistency is important for achieving a professional result.
Adding Smoothness Effects
Smoothness is another important element in Name Art Photo Editing.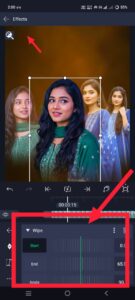 Select one photo layer and open the Effects option. Tap Add Effect and search for the Feather effect.
Apply the effect and adjust the smoothness settings according to your preference.
Repeat the process for all photos in the project.
This helps blend the photos with the background and improves the overall visual quality of the design.
Adding the Name Text
The main attraction of this editing style is the name design.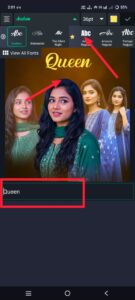 Tap the green Plus (+) button and select Add Text. Enter the desired name.
After typing the name, customise it using the available options.
You can adjust:
- Font style
- Font size
- Text color
- Position
Choose a stylish font and place the name above the photos. Make sure the text is clearly visible and properly aligned.
This step gives the design its personalised appearance.
Adding Extra Effects
If you want to make the design more attractive, you can use additional black-screen effect images.
Import the effect image into the project and position it where needed.
Select the effect layer and open the Blending and Opacity option.
Choose a suitable blending mode so that the effect blends naturally into the design.
Additional effects can help create a more creative and visually appealing final result.
Review the Entire Design
Before saving the project, carefully review every element.
Check the following:
- Background alignment
- Photo placement
- Text positioning
- Color adjustments
- Smoothness settings
- Additional effects
Many people skip this step and directly export the image. Small mistakes, such as poor alignment or improper positioning, can reduce the professional appearance of the final design.
Taking a few moments to review everything can make a significant difference.
Save the Photo
Once you are satisfied with the design, it is time to export the image.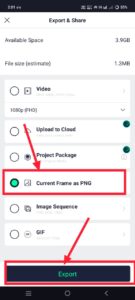 Tap the Share option located in the upper-right corner.
Select Current Frame as PNG.
After selecting this option, tap Export and wait for the process to complete.
Finally, save the image to your gallery.
Your Name Art Photo Editing design is now ready.
Alternative Method: Using AI Tools
If you want a faster method, you can also create similar edits using AI tools.
Open any AI editing application or website and upload a photo of your choice.
Describe the editing style clearly and explain how you want the final design to look.
The AI tool will process the request and generate the edited image.
Once the image is generated, save it to your device.
This method requires less manual work and can produce attractive results in a short time.
Using PicsArt for Name Art Editing
Another option is to use the PicsArt application.
PicsArt provides various tools that can help create Name Art Photo Editing designs, including:
- Background images
- Decorative PNG elements
- Stickers
- Butterfly effects
- Design resources
- AI enhancement tools
The AI enhancement feature can improve photo clarity and make images appear more detailed.
You can create the complete design using PicsArt and then save the final image directly to your gallery.
Conclusion
Creating a trending Name Art Photo Editing design in Alight Motion is simple when you follow the correct process. By combining multiple photos, attractive backgrounds, stylish text, and quality-enhancing effects, you can create professional-looking edits directly on your mobile phone.
Whether you choose Alight Motion, AI tools, or PicsArt, the process is straightforward to learn. Follow the steps carefully, make proper adjustments, and review the design before exporting. With a little creativity and attention to detail, you can create impressive Name Art Photo Editing designs that look professional and visually appealing.
Prompt
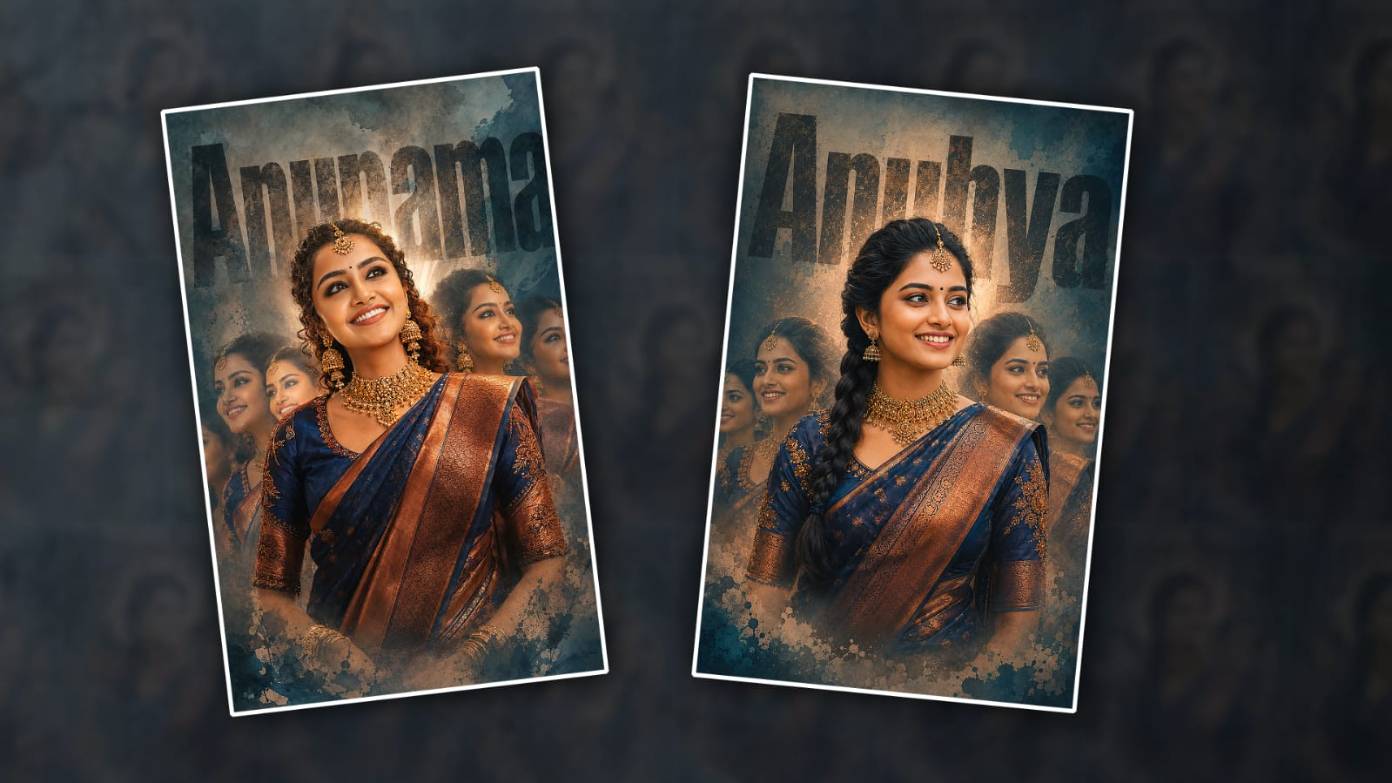
Create a cinematic Indian bridal fashion poster of a beautiful South Indian woman with a shiny smile, elegant dark blue and copper silk saree with exaggerated embroidery and play with high-priced traditional jewellery,y including choker necklaces, small necklaces and mangalsutra earrings. She had well-curled hair, stunning eyes, perfectly porous pores and skin. She looks happy and a little dreamy, like she’s looking for something. I want her image to be within the centre and to be very clear. It should be soft and fairly clear. The colours should be as rich as the inside of the film. I also want the historical past to be a little dark, so it stands out. Behind her is the call “Anuhya” in black letters. The letters look like they are engraved on something. I need to see her image around her as she changes. These pictures should be on all parts of it. History wants to be blue and grey. It feels hard to touch. There could be smooth beams and a few mists behind her head. The whole image looks like a movie poster, with a few grains to make the look believable. AA watercolour brush texture
Hi, I’m Srikanth, the founder of Srikanth Digital Works. I concentrate on Photo, Video editing, visual design and virtual content creation. Through this website, I provide editing tutorials, suggestions, and industry insights to help builders enhance their virtual capabilities.