Introduction
Trending lyrical videos are very popular on Instagram, WhatsApp Status, and other social media platforms. With the Alight Motion app, you can create professional-looking lyrical videos using your favourite photos, stylish fonts, and music. In this tutorial, you will learn the complete editing process step by step. Read the article carefully and follow each step to create your own lyrical status video.
Gather Some Files
Before starting the editing process, make sure you have the following materials ready: The
- Alight Motion app is installed on your mobile
- Stylish font styles
- Baby photos or girl photos of your choice
- Music track for the lyrical video
- Video clips (optional)
Once you have gathered all the required files, you can begin editing.
Create a New Project
Open the Alight Motion application on your mobile device.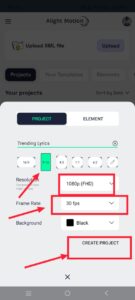
To create a new project:
- Tap the green Plus (+) icon.
- Select the 9:16 aspect ratio.
- Set the frame rate to 30 FPS.
- Choose a black background.
- Tap Create Project.
This will open the editing workspace.
Add Music to the Project
The first thing you need to add is the music track.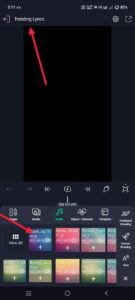 To add music:
- Tap the green Plus (+) icon.
- Select the Audio option.
- Choose the music file from your device.
- Add it to the timeline.
After adding the music, adjust the duration according to your project requirements. Remove any unnecessary portion of the audio if needed.
In this project, the photos start appearing after approximately 1 minute and 28 seconds of the music track.
Add the First Text
Before adding photos, create the opening text.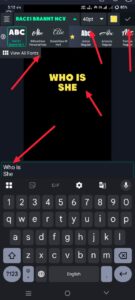
- Tap the green Plus (+) icon.
- Select Add Text.
- Type the text:
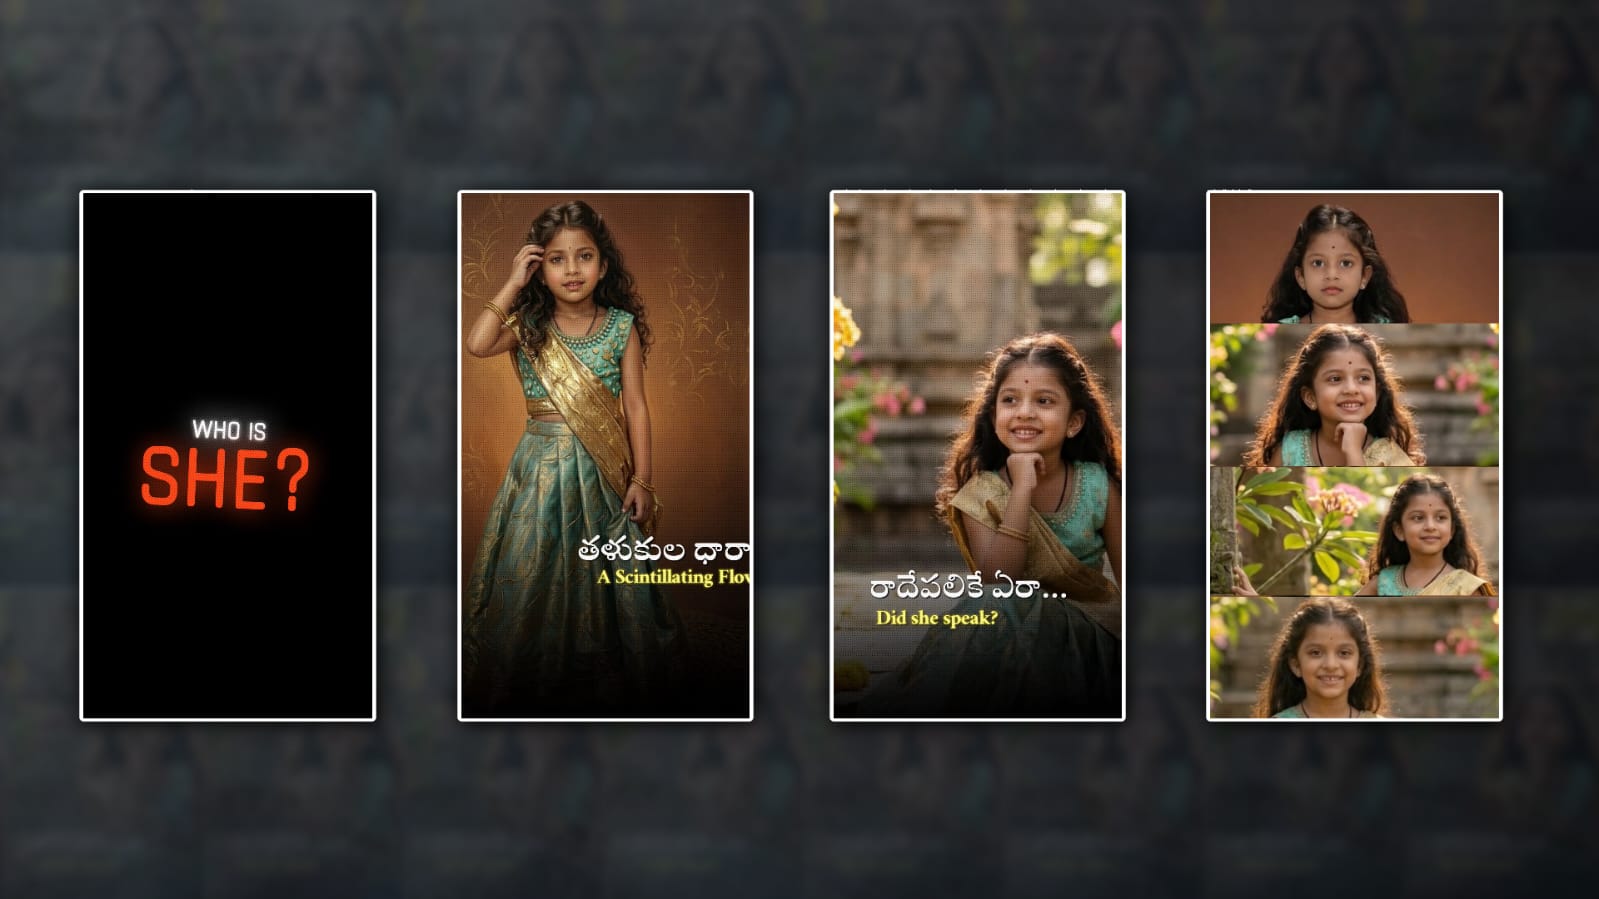
“Who Is She”
After adding the text:
- Select the text layer.
- Tap Edit Text.
- Apply your preferred font style.
- Adjust the text size.
To create a more attractive look:
- Use white colour for one part of the text.
- Use red for the other part.
Split the text into separate layers and apply the colours individually.
Add a Rectangle Shape
The next step is adding a rectangle shape.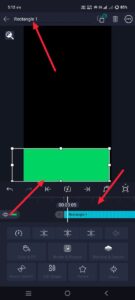
- Tap the Plus (+) icon.
- Select the Shape option.
- Add a rectangle shape.
- Change the colour to black.
- Position it at the bottom of the screen.
This will help organise the design layout for the next slide.
Add the First Photo
Now it’s time to add the photo.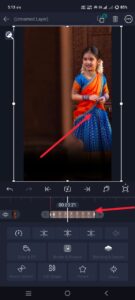
- Tap the Plus (+) icon.
- Select Media.
- Choose a photo from your gallery.
- Add it to the project.
After adding the image:
- Select the photo layer.
- Tap the three dots in the top-right corner.
- Choose Fill Composition Area.
This will automatically fit the photo to the screen.
Position the image at the centre.
Add Telugu and English Text
After adding the photo, place text on top of it.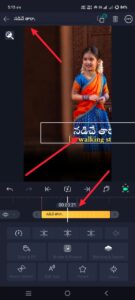 Create two separate text layers:
- One in Telugu
- One in English
For the English text:
- Use the yellow colour.
For the Telugu text:
- Use white colour.
Position both text layers neatly and align them properly on the screen.
Once the text placement is completed, the first slide is ready.
Apply Effects to the Photo
To improve the appearance of the photo:
- Select the photo layer.
- Open the Effects section.
- Add the required effects to make beautiful overlays
- Adjust the settings according to your preference.
These adjustments help improve the overall visual quality of the slide.
Add a Camera Layer
To create movement and animation, add a camera layer.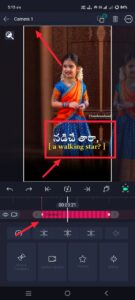
- Tap the Elements option.
- Select Camera.
The camera layer will be added to the timeline.
Keep the camera layer for approximately two to three seconds and remove any extra duration.
Create Camera Animation
Now create an animation using the camera layer.
- Select the camera layer.
- Open Move & Transform.
- Select the Move option.
- Add a keyframe at the beginning.
- Add another keyframe in the middle.
- Add a final keyframe at the end.
Create a left-to-right animation using these keyframes.
This gives the slide a smooth motion effect.
Duplicate the Existing Slide
Creating every slide from scratch takes a lot of time.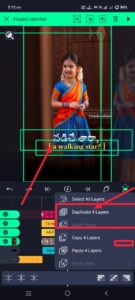 Instead of repeating the entire process:
- Select all layers from the completed slide.
- Copy them.
- Paste them into the next section of the timeline.
This method saves time and keeps all styles, fonts, and effects consistent.
Change the Lyrics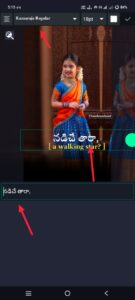
After duplicating the slide:
- Select the text layer.
- Tap Edit Text.
- Listen to the song.
- Replace the previous lyrics with the new lyric line.
The existing font styles, colours, and effects will remain unchanged.
This makes the editing process much faster.
Replace the Photo
To use a different photo:
- Select the photo layer.
- Open the Colour & Fill option.
- Choose the Media option.
- Select a new image from the gallery.
The new photo will automatically replace the previous one while keeping all existing effects and settings.
Repeat the same process throughout the video.
Use Different Animation Styles
Avoid using the same animation repeatedly on every slide.
You can create different movement styles, such as:
- Left to right
- Right to left
- Top to bottom
- Bottom to top
Using different animations makes the final video look more professional and visually engaging.
Create the Final Slide
At the end of the video: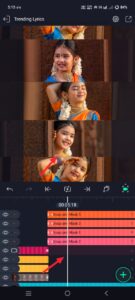
- Add four photos together.
- Crop each photo into a rectangle shape.
- Arrange them properly.
- Animate all four photos together.
This creates an attractive ending for the lyrical video.
Common Mistakes to Avoid
Before exporting the project, review everything carefully.
Some common mistakes include:
- Using low-quality photos
- Applying effects incorrectly
- Incorrect timing of photos
- Incorrect timing of video effects
- Poor synchronisation with the music
These small mistakes can reduce the overall quality and professional appearance of the final video.
Always preview the entire project before exporting.
Export the Video
Once everything is completed:
- Tap the Share option in the top-right corner.
- Choose your preferred quality settings.
- Tap Export.
The exporting process will begin.
After the export is completed, tap Save to store the video on your device.
Frequently Asked Questions (FAQ)
Which aspect ratio should I use for this project?
Use the 9:16 aspect ratio for creating this lyrical video.
What frame rate should I select?
Set the frame rate to 30 FPS when creating the project.
Can I use my own photos?
Yes. You can use baby photos, girl photos, or any photos of your choice.
How do I replace a photo after applying effects?
Use the Colour & Fill option and select a new image from the gallery. The effects will remain applied.
How long should the camera layer be?
Keep the camera layer for approximately two to three seconds and remove any extra duration.
Can I use different animations on different slides?
Yes. You can use left-to-right, right-to-left, top-to-bottom, or bottom-to-top animations for a more professional look.
Conclusion
Creating a trending lyrical video in Alight Motion is simple when you follow the correct process. By combining photos, lyrics, animations, effects, and music, you can create an attractive status video for social media. Take your time to align the text properly, use good-quality photos, and check all timings before exporting. With careful editing, you can create a professional-looking lyrical video directly on your mobile device.
AM Project Import
Hi, I’m Srikanth, the founder of Srikanth Digital Works. I concentrate on Photo, Video editing, visual design and virtual content creation. Through this website, I provide editing tutorials, suggestions, and industry insights to help builders enhance their virtual capabilities.